Learn how to make a Wood TV Console. I decided to make a newer version of an old TV console build I had done, but had not recorded on video. This new TV Console looks great, is a very quick build, and adds functional storage. Be sure to check out the in depth plans with a complete wood and cut list here. Watch the video below and share with others!
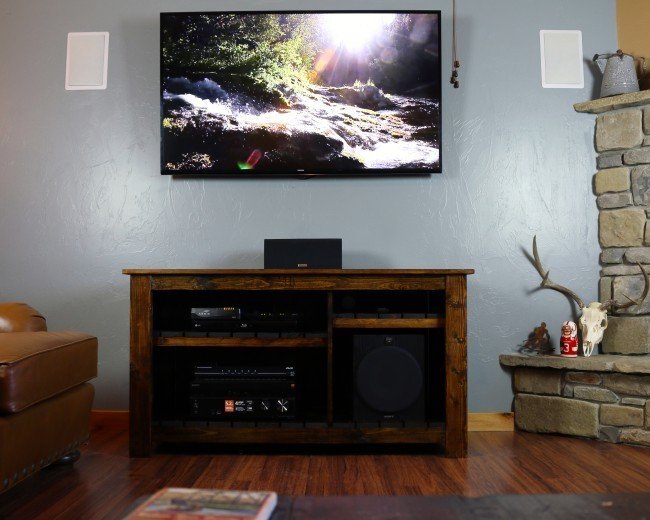
My TV Setup includes
- Samsung 60 Inch LED SMART TV – Has Pandora, Netflix, Amazon Instant, Spotify, MLB, and many other Apps. Love it!
- Articulating, Swivel, and Tilt TV Mounting Bracket – Heavy Duty and works great
- Sony STR-DH550 Receiver/Amp – Plenty powerful, lots of HDMI ports, and affordable
- Sony SA-W3000 Subwoofer – Plenty powerful, good bass, makes it feel like a movie theater.
- Check out our video How to Hide TV Wires to learn more about the mounting, install, and wiring of the TV into the wall
- I use a Wiring Kit – this one thats made by PowerBridge TSPBIW Kit
Tools Needed
- Miter Saw
- Drill
- Orbital Sander
- Nail Gun
- Tape Measure, Ruler, Pencil
- Eye and Ear protection
Optional:
- Circular Saw - Could be used in place of a miter saw
- Table Saw
- Clamps
- Speed Square
Supplies Needed
- Wood - Which we go over in the Plans
- Wood Glue - I recommend Gorilla Glue
- Minwax Dark Walnut Stain and Polyurethane
- Sandpaper
- 1 ½” Kreg Screws
- 1 ¼” Kreg Screws
- 1 ¼” Wood Screws
- 2” 18 gauge Nails
Approximate Total Cost: $135
The TV Console can be built for around $135 in materials cost at time of this build. This is the cost for the lumber and other basic supplies, but does not include things we’ll assume you may have around the shop - *Note: This doesn’t include things you may already have around the shop, including: screws, staples, nails, glue, sandpaper, finish, etc.

Cut the Wood
We'll start this project by making out Main Frame’s cuts on the miter or circular saw. Refer to the cut list in the plans for dimensions of the Main Frame - Legs, Stretchers, and Side Stretchers. If you prefer to do all cutting at once, feel free to make the other cuts, listed above, now. We’ll start assembly next.

Assemble the Main Frame
After you’ve made the cuts for the Legs, Stretchers, and Side Stretchers we can start assembly. These pieces will go together with pocket hole joinery done on the Kreg Jig. For the pocket holes going from stretchers to legs, set your Kreg Jig and Bit at the ¾” setting. Use 1 ½” Kreg Screws and wood glue to assemble it all, being sure that everything is square.


Build and Install Shelf Divider
Now we will build the divider piece shown below. The dimensions for the dividers are shown in the plan blueprints here. The shelf divider installs 28 ¼” over from the inside of the leg, I gave the left side looking straight on at the console the 28 ¼” room. The shelf divider then goes together with 1 ¼” screws and installs into the main frame with ¾” pocket holes and 1 ¼” Kreg Screws.


Attach the Lower Shelf Slats
Grab your lower shelf slat pieces and prepare to install them. For this, I’d recommend Ryobi’s 18 Volt Nail Gun with 2”, 18 gauge nails. Place the boards into place, referring to the plans for the custom edge and end piece sizes. Glue and nail them all into place.
Build the Two Upper Shelves
We’ll start the two upper shelf process by building their frame that holds the slats and installs into the main frame and divider. Kreg the shelf frame together with glue and 1 ¼” Kreg Screws and prepare to install them.

Install the Side Panels
Now it's time to put the side panels into place, we’re almost done with the TV Console! You should have two 1x6 boards and one cut down to actual ¾”x5” for the side panels. Put them in place and tack with nail gun to temporarily position, we’ll add screws from the back for extra support. Refer to the plans for more info regarding this, we’re simply pre drilling and screwing in 1 ¼” wood screws into the side panels.

Install the Back and Tabletop
The last step of this project is to attach the back and tabletop to the TV Console. The back is a piece of plywood that we'll cut holes into for the wires to feed through. The tabletop consists of a 1x10 and a 1x12. You can kreg the two together on the underside if desired. The tabletop should have a 1” overhang on the left and right side of the main frame. Glue all surfaces that connect the frame and the tabletop and then tack it into place with nails. Let everything dry/cure and then sand/prep it all for finishing!


Stain and Seal the Project
I used Minwax’s Dark Walnut stain for this TV Console, I love the color and look it achieved here. For a similar look, use that stain and add two coats to ensure full coverage. After the stain has dried, follow through with a coat of Minwax’s Polyurethane over the whole project - this really seals it all in and adds a nice gloss to the project. Let everything cure and you’re done!

Install TV Components and Enjoy
You're done - almost! Bring your TV Console inside and install all of your tv components, sound system, dvd player, etc. Sit back, admire your work, and enjoy! Cheers from Montana.

More Projects by DIY PETE
If you enjoyed this projects, be sure to check out some of these other builds below, subscribe to DIY PETE Youtube Channel and check out the plans page for detailed build plans for your next project!