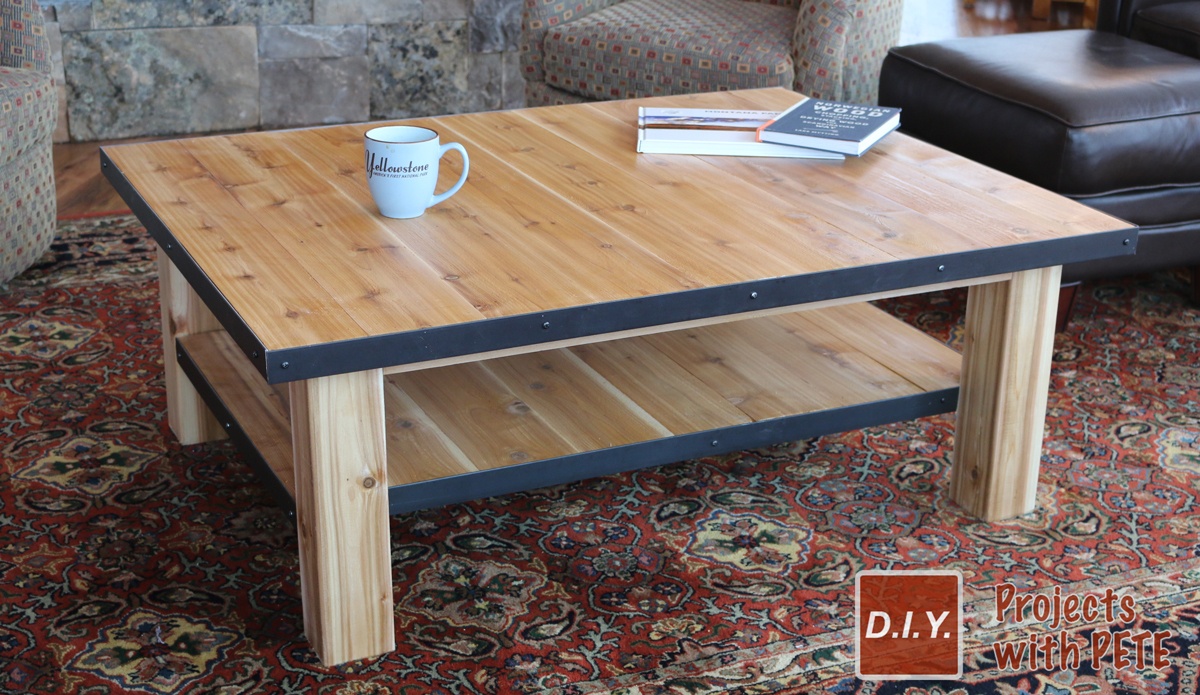
Thank you for stopping by to check out the latest project tutorial about how to make a wood coffee table with steel accents. The project is fun to create and simple to build. I love combining different materials and think the steel and wood compliment each other well. To seal the cedar I used the water-based Minwax Polycrylic Protective Finish. The sealer is super durable, dries quickly, and is crystal clear. I like how it gives the wood a raw and organic look.

This project is sponsored by Minwax and I was compensated to create this article. I only promote products I truly believe in and would recommend to my friends and family. Minwax is one of those products. I’ve been using their stains and sealers for years. They have all sorts of stain and sealer options. I use the oil based polyurethane quite often and one of my favorite Minwax stain colors is special walnut.

Download Plans
 Gather Supplies, Materials, and Tools

Shopping List:
- Minwax Polycrylic Protective Finish
- Qty 1: Box of qty 100 – 2 1/2 inch long pocket hole screws
- Qty 1: Box 2 inch wood screws
- Qty 1: Box of 1 inch nails for nail gun – 18 gauge
- Qty 1: Box 1 inch long #8 screws to connect metal
- Qty 1 or 2: Construction adhesive tubes
- Spray can of a metal sealer
- Metallic or black spray paint to help screw heads match
- Wood glue
- Drill bits
Please note: Some of the links in this post are affiliate links. If you purchase an item through the link my website will get a small commission at no extra cost to you. Thank you for helping support the DIY Pete website!
- QTY 1: 4×4 by 8 feet long – legs
- Qty 9: 1×6 by 6 foot long pickets ( actually 5/8″ thick )
- Qty 1: 4×8 sheet of 3/4 inch thick plywood (OSB will work and is cheaper)
- QTY 2: 2X4 by 8 feet long
Please read: These are dimensional lumber measurements and how the boards are marked at your local lumber yard. The downloadable plans have the converted measurements. For example (a 2×4 board is actually 1 1/2 inches thick by 3 1/2 inches wide).
Steel: If buying from a steel mill it will be much cheaper and you can buy in longer segments. Two 10 foot segments will get you close, but you’ll need an additional couple feet for the last piece so pick up an additional 4 foot steel bar.
- Qty 2: 1 1/2 inch long by 1/8 inch thick by 10 feet long steel bar
- Qty 1:1 1/2 inch long by 1/8 inch thick by 4 feet long steel bar
If you purchase from Home Depot they only sell 4 foot long segments and they are more expensive. You’d need seven 4 foot long segments.
*Make sure to let the wood dry out prior to building. Cedar pickets typically have a high moisture content so let them dry a week or so prior to building your headboard to prevent shrinkage.
*Pallet boards could be used instead of pickets.
Tools:
- Drill
- Impact Drill (Optional)
- Pocket Hole Jig
- Miter Saw
- Table Saw
- Orbital Sander with 120 to 220 grit sandpaper
- Sanding Block with 600-800 grit sandpaper
- Paint Brush
- Pencil
- Speed Square
- Clamps (optional)
- Tape Measure
Safety Equipment
- Dust Mask
- Eye Protection
- Ear Protection
- Hearing Protection
- Rubber Gloves
Please note there are affiliate links in this article. By using the links to purchase the items used in this project you are helping support our DIY Projects with Pete. Thank you!
Need more tool recommendations or curious about the tools I trust and use in my builds? Visit my Amazon Store to find everything I recommend for DIY projects big and small! https://www.amazon.com/shop/petesveen?ref_=cm_sw_r_cp_ud_aipsfshop_2HRAJ4RJR0J89C2ST1F4
Approximate Cost at Time of Build:
Prices will vary depending on where you live and where the wood is purchased. Here is a look at the approximate costs.
Total cost for all wood ( Pine ) – $72 | Total project cost using cedar: $192
Total cost for all wood ( Cedar ) – $99 | Total project cost using cedar: $165
Notes: You will save roughly $18.00 off the prices above by finding the steel at a local mill. You will save another $18.00 by using 3/4 inch OSB instead of a cabinet grade plywood. Make sure the plywood you use is not warped. The total cost does not include tools.
Get ready to build!

It’s time to get rocking and rolling on your coffee table build! Get all your stuff together and start taking action!
Cut the plywood
Measure for your plywood cuts and use a straight edge to draw the lines with a pencil. Use a circular saw to make each cut. Take your time and follow the lines as close as possible. Use the measurements which are available in the plans.
Cut and place the pickets

Use a miter saw to cut the pickets to length.

Attach each picket using wood glue and some construction adhesive. Since some of the boards are not perfectly flat, the construction adhesive can help ensure the picket stays in place.

Use a nailer with 1 inch long 18 gauge nails to secure each picket. Press down on each picket while nailing to level out the boards as much as possible. You will need to cut each end board down on a table saw so it fits on the plywood perfectly.
Make the base

Cut the legs and 2×4 boards on the miter saw.

Use a pocket hole jig to create pocket holes on the ends of each 2×4 board.

Here is an up close view of the pocket hole jig. Set the jig for 1 1/2 inch thick stock on both the jig and bit stop collar.

Sand the wood with 120 or 220 grit sandpaper prior to assembling.

Use 2 1/2 inch pocket hole screws in each pocket hole. Use wood glue at each joint to make sure each connection is nice and strong.

Secure the base to the plywood / top from the underside using 2 inch long wood screws. Add screws about every 6 inches around the perimeter and through the middle 2×4 board.
Create the shelf

The lower shelf is made very similar to the table top. The size is different and the other change that the pocket holes are drilled at each corner prior to attaching the pickets. The pocket hole jig should be set for 3/4 inch thick stock. The pocket holes will allow the lower shelf to be attached directly to the 4×4 legs.

Sand the pickets to smooth them out. You can leave a little texture if you’d like on the boards. Wear a dust mask during the sanding process.

Put the lower shelf into place. I cut some scrap 4×4 boards to 5 1/2 inches in height for spacers to hold the shelf in place and line it up. Once in place I used clamps to secure it.

Rotate the table on it’s side so you have room to attach the lower shelf using 2 1/2 inch long pocket hole screws.

Sand the top with 120 or 220 grit sandpaper. Let the dust settle when complete and then use a brush and damp rag to clean the surface prior to sealing the wood or applying a stain.

Apply a finish of your choice. I used the water-based Minwax Polycrylic Sealer. It is durable, dries quickly, and leaves a crystal clear finish. Brush 1 coat on all surfaces of the table.

The sealing process goes rather quickly. Use a descent brush and work around the table.

It is a good idea to use a respirator whenever working with stains and sealers. The water-based sealer only takes a few hours to dry and it doesn’t smell much.

Once dry, use 600 grit sandpaper to lightly sand between coats. This will smooth out the surface prior to the final coat of sealer. Use a damp rag to remove dust before the second coat.

Use a brush to apply a thin second coat of sealer.

Here is what the table looks like after the second coat.
Cut and add steel accents

Measure each edge on your table. The two long edges on the table top will have the steel cut 1/4 inch longer then the actual width of the table. This will allow the steel to line up correctly with the steel on the shorter edges. I’d recommend measuring each edge and cutting one piece of steel at a time. Do the two shorter sides first for the table top.

Cut the steel using a reciprocating saw or a metal cutoff blade on a grinder. Be very careful with this process.

Drill holes in each piece of steel. Space the holes evenly. Drill at least the two outside holes prior to attaching it to the edge.

Use a spray sealer to apply a clear finish on the metal. The sealer will slightly darken the metal.

Spray paint the screws with a dark metallic or black paint to help them blend in with the metal flat bar.

Attach each side one at a time. Use a little construction adhesive along each side. Attach with 1 inch long #8 screws or something similar.

Drill additional holes as needed to help secure the metal in place. The long edges will overlap at each end about an 1/8 of an inch to account for the 1/8 inch steel bar on each shorter side.

Secure the metal in place with a screw at each hole.

Take your time. Use a small bit to pre-drill if needed to help make sure the metal flat bar lines up properly.
Enjoy your new coffee table!


Thank you for taking the time to look through the DIY Pete coffee table with metal accents tutorial. I hope it inspires you to take action and make some DIY projects for your home! Please post project photos below and share this post with your friends and family. Cheers from Montana! – Pete
Download the DIY Pete coffee table plans to get started today!
Looking for additional woodworking projects? Check out other detailed, instant downloadable plans here!