Thank you for stopping by to check out the FREE Patio bar plans! I created the plans because I was having a hard time finding ideas and plans to make a unique bar to put out on my deck. So, I did something about it and created the most in-depth video and tutorial online about how to make a cedar patio bar with a concrete top and LED lights. In this tutorial I will walk you through the process of creating your own patio bar. For the FREE printable plans with all the dimensions and even more details simply enter your email address below!
Need more tool recommendations or curious about the tools I trust and use in my builds? Visit my Amazon and Lowes Storefronts to find everything I recommend for DIY projects big and small!
Step 1:
Measure and then cut the Melamine wood to size using a circular saw. Use a jig saw if needed to cut hard to reach areas.
Step 2
Cut the sidewalls for the concrete bar mold using a table saw or circular saw. I cut mine to 3 3/4 inches wide. This gave me a nice bold looking concrete top that was a total of 3 inches thick. The extra 3/4 of an inch is to compensate for the base of the mold.
Step 3
Layout the sidewalls of the mold to make sure everything fits correctly.
Attach the sidewalls to the base using 1 1/2 inch drywall screws. Pre-drill prior to inserting the screw.
Step 4
Use a knife to cut 1 1/2 inch thick foam for the knockout in your mold. It will be slightly smaller than the mold. There is a 1 inch channel around the entire perimeter between the foam and the sidewalls. This will allow concrete to form around the foam and to create a lip. Your concrete counter will look like it is 3 inches thick throughout. However, it will only be 1 1/2 inches thick where the foam is placed. Thus, you'll reduce the weight of the countertop dramatically and will not have to purchase as much concrete.
The foam I used had a metallic backing. Please note that any foam will work. I bought smaller project sized pieces and then used packing tape to piece them together. I also sealed all the edges of the foam with clear packing tape so the foam would release from the concrete easily.
The concrete will go into the gaps and form an "Apron" or "Lip" around the edges.
Step 5
Cut re-enforcement for the concrete down to size. It typically comes in 4x8 sheets at Home Depot.
Step 6
Seal the joints in your mold with 100% silicon caulk. Use silicon to adhere the foam to the base of the mold as well. Let the silicon dry before adding the concrete.
Step 7
Mix up your concrete 1 bag at a time. I'd recommend using Quikrete Counter Top mix. If you can't find countertop mix, Quikrete 5000 will work. The countertop mix consists of finer aggregate and is much easier to create a perfect hard trowel finish with. Mix the concrete with a hoe or a shovel. Add water until it is about a cookie dough type consistency.
Step 8
Add the concrete to the mold. Use a shovel, bucket, or your hands to pack it into the counter top mold.
Use your hands and fingers to pack the concrete into all areas of the mold. Make sure to wear rubber gloves whenever handling concrete.
Step 9
Fill the mold half full with concrete. Then place the re-enforcement in the concrete. Make sure it is as flat as possible. Then continue adding concrete until the mold is full.
Step 10
Screed the concrete using a 2x4. Simply move the 2x4 in a saw-like motion back and forth. This will level out the concrete. Fill in low spots as needed and screed from one side to another until the concrete in the mold is as level as possible.
Use a trowel to smooth the concrete for the first time. If you have a float, you can use it to help bring more "cream" to the surface which helps make the hard troweling process a bit easier.
Step 11
Vibrate the concrete a few times throughout the process. There are a few ways that a DIY'er can accomplish this. One is to use a rubber mallet and to tap the sidewalls and underside of the mold. Air bubbles will release and pop out at the surface. You can also use an orbital sander and use the vibration to help remove air bubbles around the sidewalls. Lifting the entire work surface up and down quickly will help too.
Step 12
Use an edging tool to give the top edges a beveled finish.Slightly raise the leading edge of the tool so you don't dig into the concrete.
Smooth out the concrete again using a trowel.
Step 13
This is one of the most important steps. I like to compare it to watching the grill so you get a perfect medium rare steak for dinner. Except with this, it takes a lot longer and you don't get to eat a steak. Anyhow, let the concrete firm up for a few hours and check it every half hour because curing time will depend on temperature, humidity, the amount of water used, and the concrete mix. Use a finger to test the firmness. If it leaves a small dimple and you don't get any water or concrete on your finger it is ready to remove the sidewalls and trowel.
Step 14
Slowly remove the sidewalls. If the concrete sags make sure to put the sidewalls back on and to wait longer. Once the sidewalls are off you can smooth out the edges and fill any bugholes with extra concrete. Fill the bugholes using either the countertop mix or mix up your own fill using portland cement, water, and a pinch of sand. Trying to fill in holes with regular Quikrete 5000 won't work well because it consists of large aggregate (rocks).
When the sides are all smoothed out you can move onto the top surfaces. Use your concrete trowel to give the bar top a super smooth finish. The hard troweling process will give the top an organic and natural look. It has a handcrafted touch!
Step 15
Allow the concrete to cure for 3 to 4 days. Then rotate the concrete vertically and remove the foam knockout. Make sure to have a friend help out with this process. Pull the foam away from the concrete.
Place wood blocks below the concrete to prop it up and allow air to flow under the bar top. This will help the bar top cure evenly. Let the concrete continue to cure for another 24 hours or more.
Here is a look at the apron which formed around the foam knockout. This apron made the concrete look 3 inches thick. However, it is only 3 inches thick around the outside edges and is 1 1/2 inches thick throughout the rest of the piece. Meaning you save money on concrete and the bar top will weigh much less.
Step 16
Lightly sand the surface and sides of the concrete with 400 grit sandpaper. This will remove any rough spots.
Step 17
Prepare for the acid staining process by pouring the stain into acid resistant spray bottles. Make sure to wear rubber gloves, safety glasses, and a mask for this process. Dilute the stain as recommended by the manufacturer.
Pour water on the concrete prior to staining. This helps the stain go on more evenly and helps prevents unwanted droplet stains.
Spray the acid stain on. I used Quikrete acid stain and used 2 colors. (Coffee and Black). The acids will slowly change the color of the concrete.
Highlight areas with another color if desired. Once the entire surface is covered you can let the stain set into the concrete and dry.
Let the stain set for at least 8 hours. I'd recommend overnight if possible. This is what the concrete looked like after it sat overnight.
Step 18
Neutralize the acid stain by mixing baking soda or a small amount of ammonia with water in a 5 gallon bucket. You'll only need a table spoon or 2. Pour the solution on the concrete.
Use a rag to lightly clean any remaining residue from the surface. Rinse a few times with more water. Then let the concrete dry prior to the sealing process.
Step 19
Seal the concrete using a clean rag and a water based concrete sealer. I'd recommend 3 or 4 coats.
I used a high gloss concrete sealer from Quikrete. It looks great and has been super durable.
Step 20
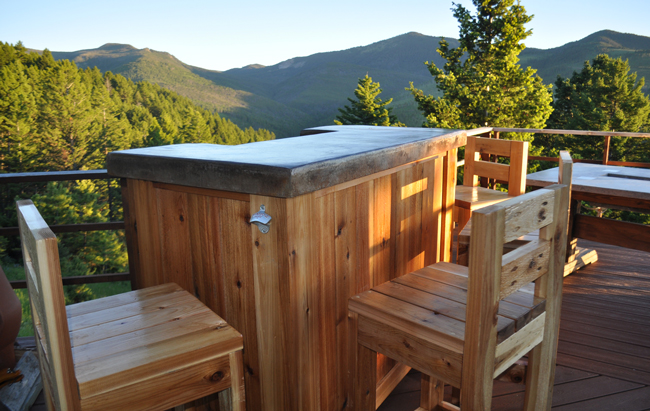
Move the base to the patio and install the concrete top. I like to run a bead of silicon around the top of the base prior to setting the concrete on it. This helps prevent it from sliding around. Then add a bottle cap opener and catcher to the side of the bar if you'd like!
Step 21
Add LED lights to make this bar the talk of your next party or barbecue. I used 16 feet of LED strip lighting and ran it around the outside channel of the concrete. Secure the controller to the inside using velcro. The strip lights will secure to the concrete with the adhesive backside.
LED strip lighting along the outside channel of the concrete.
Step 22
Have a barbecue and put your new patio bar to use! Cheers!
Happy hour! It's five o'clock somewhere.
Montana views....
Inside of the bar lit up with LED lighting.
LED lighting that changes colors
Classy night look.
Opening a cold brew with the bottle opener and cap catcher.


