Need more tool recommendations or curious about the tools I trust and use in my builds? Visit my Storefronts on Amazon and Lowes to find everything I recommend for DIY projects big and small!
Total Cost For Wood and Materials: Approximately $75-$100 Cornhole Toss Bags
I used a vinyl stencil to paint on a Nebraska Huskers design. I have a largeGraphtec Vinyl Cutting Machine, yet there is a much more affordable option fromCriCut. You can also order custom stencils and NCAA licensed decals from companies likevinyldisorder.com.
Wood to buy for entire set (both boards): Qty: 4 Type: 2x4 by 8 feet long
Qty: 2 Type: 1/2 thick plywood (2feet by 4 feet)
Hardware to buy:
Qty: 4 Type: 3/8 inch carriage bolts (4 and 1/2 inches long)
Qty: 4 Type: 3/8 inch washers
Qty: 4 Type: 3/8 inch wing nuts
Other Supplies: 2.5 inch wood screws
1.5 inch wood screws
120 grit sandpaper
Paint
Masking tape / stencils
MinWax SemiGloss Polyurethane
Supplies/Equipment for Making the Bags
Sewing Machine
Duck Cloth
Thread
Dried Corn, Beans, or Plastic Pellets
Cut List For Entire Project (both boards) QTY: 4 - 2x4 - 48" long (Sides of platform)
QTY: 4 - 2x4 - 21" long (Short sides of platform)
QTY: 4 - 2x4 - 12" long (Legs, will shorten with an angle in a later step)
QTY: 2 - 1/2 thick plywood (2 feet by 4 feet) - For the Platform Top
The Build
1. Build the frame
First, you'll want to build the frame for the cornhole platform. Lay the 2x4's on a flat surface and connect the boards using 2 1/2 wood screws. I'd recommend drilling pilot holes prior to using the screws to eliminate the chances of wood splitting. Use 2 screws in each corner. More info and blueprints in downloadable plans.
You may also connect your boards using pocket holes if you have a Kreg Jig. This is 100% optional. The benefits are that all screws are hidden and you don't have to fill screw holes with putty on the top platform. See the video tutorial above for more details.
2. Connect the top Platform
Use 1 1/2 inch long wood screws to attach the 1/2 inch plywood to the 2x4 frame. Pre-drill pilot holes to prevent the wood from splitting when the screw goes in. Place screws around the perimeter of the board spaced about every 8-10 inches. Countersink the screws a bit so you can fill them in with wood putty in a later step.
Optional: You may use a Kreg Jig to connect the frame to the plywood. This will create pocket holes so you can attach the plywood from the underside. Using pocket holes will make it so you do not have any holes that need to be filled on the top surface. If using this method, set your Jig and drillbit to the 1/2 inch setting and screw it together with 1 inch Kreg screws.
3. Make and attach legs
Cut the legs for each platform to 12 inches. Later, we'll angle the boards and shorten them just a bit. First, measure 1 3/4 inches down from the top of the board and make a mark. Second, measure 1 3/4 inches from the side. You'll drill a 3/8 inch hole where the center marks are. Use a compass to draw an arc which will round off the top so the legs will be able to fold.
Use a jig saw to cut the arc for the top of each leg. Then run an orbital sander around each to smooth them out.
Attach the legs to each board
The rounded side should be flush with the corner. Then use a 3/8 inch drill bit to go through the hole in the leg and to create a new hole in the 2x4 frame behind it. Learn more in downloadable plans.
Use 4 1/2 inch long 3/8 inch carriage bolts to attach the leg. Put a washer and wing nut on the inside of the leg. Check to make sure they open and close easily. You can use an orbital sander to sand down high spots on the arc in case the leg isn't folding easily.
Level and angle the legs
You will need to cut the legs at an angle so they rest evenly on the floor. They typically need to be cut at an angle of about 8 degrees. However, many times the carriage bolt hole is not drilled in the exact spot or there is some warp in the frame which will cause an angle to be slightly different. To ensure the table is 12" off the ground and has the correct angle I like to level the table using the process below.
Put the cornhole table on a large and flat table. Shove a box underneath and check to ensure the back board is at 12" above the surface. Once this has been done, slide the corner of the platform over the edge of your surface (Video above helps describe this process).
Once the table has been slid to the side, you can use the surface below as a straight edge to draw a line for the angle that will need to be cut.
Cut the angle on the miter saw. It will typically range between 5 to 10 degrees. Here is a photo of the legs with the angle cut.
Make the Hole
The next step is to cut the hole for the platform. I had to re-take a few photos which is why you see a hole in the boards and paint in the previous photos. Measure 9" down from the top of the board. Then measure 12" from the side of the board. Where both marks meet is where you will want to mark for the center of the hole. Then use a 6" hole saw to cut the hole. If you do not have a hole saw you can use a jig saw. Make sure to hand sand the edges of the hole after cutting.
Here is an example showing cutting a hole using a jig saw. You'll want to draw a 6" diameter circle so you have a line to follow.
Paint
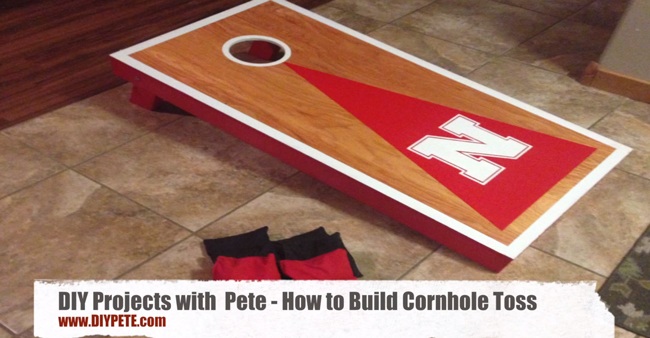
Do a google search for all sorts of ideas on how to customize your boards. I used masking tape to create a 1 1/4 inch border and an arrow. Paint the boards using a brush or roller. I used latex paint because it has low VOC (fumes) and is durable.
I used a vinyl stencil to paint on a Nebraska Huskers design. I have a largeGraphtec Vinyl Cutting Machine, yet there is a much more affordable option fromCriCut. You can also order custom stencils and NCAA licensed decals from companies likevinyldisorder.com.
I am not going to go too in-depth on this process, but just want to give you a quick overview. You'll want to buy enough duck cloth to make 8 bags (4 of each color). Duck cloth is a thick and durable fabric. Cut the fabric pieces in 7" pieces. Fill each bag with between 14-16 oz of dried corn, beans, or plastic pellets. The finished bags will measure 6x6 inches.
I'm not much of a sewing type of guy, but ended up figuring it out. This is a pretty useful tool!
Filling the bags with dried corn.
Have Fun and Enjoy Your New Cornhole Boards!
Questions or comments? Ask away! Feel free to comment below. Cheers and good luck with the project!
More Outdoor Projects From DIY PETE
If you enjoyed this project tutorial, here are a few more you should check out. Cheers!