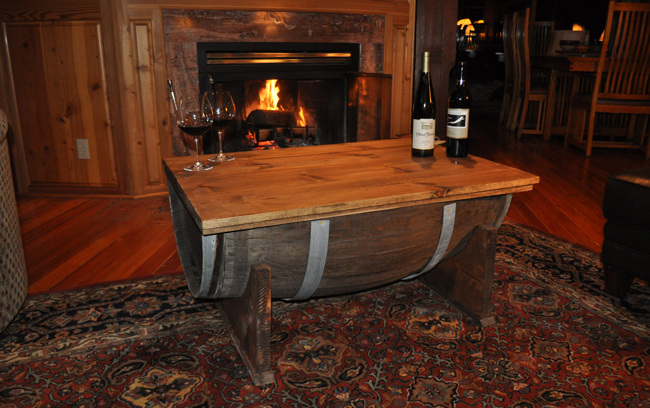
Looking for a unique DIY coffee table that doubles as storage and a conversation piece? In this step-by-step tutorial, I’ll show you exactly how to build a whiskey barrel coffee table using an old barrel and basic woodworking tools.
This project is beginner-friendly, affordable, and perfect for adding a rustic, farmhouse-style centerpiece to your home, shop, or patio.
Whether you call it a whiskey barrel table, wine barrel furniture, or barrel coffee table, this build is one of my all-time favorites.
Project Costs
One of the best parts of this build is the cost.
- Whiskey Barrel: $25–$200
- Lumber: ~$30–$60
- Hardware & Supplies: ~$25–$50
Pro Tip: A full barrel can be cut in half—giving you materials for TWO tables.
Tools Required for making Whiskey Barrel Table
- Kreg Jig - For building table top
- Orbital Sander
- Miter Saw – A hand saw will work but a Miter Saw will make the project go quick!
- Jig Saw – Used for creating the base
- Rubber Mallet and Pry Bar – Used to remove metal bands and flush up boards.
- Drill
- Clamps
- Reciprocating Saw - (Can use to cut barrel in half if not pre-cut.)
- Table Saw - Optional
- Circular Saw - Optional
Supplies
- 1 1/4 inch Kreg Jig Screws
- Chest Lid Support
- Chest Hinges
- 3 inch, 1 1/2 inch, and 1 inch wood screws
- 220 Grit Sandpaper
- Stain ( I used "Special Walnut" from Minwax)
- Polyurethane (Minwax) - To help protect the table top
Lumber List
1×4 - QTY 1 Length: 10 feet (Used for table apron)
2×12 - QTY 1 Length: 6 feet (Used for table base)
1×3 or 1x2 – QTY 1 Length: 6 feet (Used for decorative base pieces)
1×8 – QTY 2 Length 8 feet (used for table top)
Where to find a whiskey barrel?
Finding a barrel is easier than you think:
- Local distilleries or wineries
- Facebook Marketplace / Craigslist
- Farm & garden stores
- Online (eBay, etc.)
I found a few wine barrels locally in Montana from a super nice guy who was selling them on Craigslist. I feel like I got a great deal because I paid $100 for the full barrel and $25 for the pre-cut half barrels. If you get a full barrel you'll need to cut it in half using a jigsaw or sawzall.

I made my table out of a pre-cut whiskey barrel I found locally. They had been sitting outside for a few years and definitely had some character.

Step-by-Step: How to Build a Whiskey Barrel Table
Step 1: Prep the Barrel
- Remove metal bands (leave the end bands on)
- Tap boards flush using a rubber mallet
- Lightly sand to clean and smooth
This keeps the aged, rustic look while making it furniture-ready.
* Use a prybar to remove the metal bands. The bands are most likely secured with nails and so they should pop right off. Do not take the end bands off, because the barrel will fall apart if you do.

Use a rubber mallet to flush up the boards if they stick out farther than they should. Do your best to get them somewhat even with each other.


Step 2: Stain the Barrel
Apply your stain evenly using a rag or brush.
- I used Special Walnut for a warm, natural tone
- Let dry fully before moving on

Step 3: Reassemble the Barrel
- Reattach metal bands using screws
- Line up with existing holes for best fit
- Screws help tighten everything up better than nails

Use 1 inch screws to re-connect the bands. The screws are helpful compared to nails because they will sometimes pull on boards to even them out.

Step 4: Build the Base
The base keeps your barrel stable and level.
- Cut two 2×12 boards
- Trace an arc to match the barrel curve
- Cut using a jigsaw
- Test fit and adjust as needed
*This is the most technical step—but once it fits, everything comes together fast.

This is a somewhat tricky part that I try my best to explain in the video above. I found the depth of the barrel to be 13" where the base pieces would touch. The width of the barrel at this portion was 25 inches. So, I put a mark on the 2x12 at 13.5" which was the center of the wood. I then measure down 3 inches and marked where the two points met. Next, take the width of the barrel where the base will sit (25 inches in my case), and divide by two to get 12.5". Then, take a paint stick and drill one small hole near the top. Line the hole up with the center point you created earlier. Measure 12.5 inches down from that hole and drill another small hole. This small hole will serve as the pivot point. You'll want to put a tack or screw in to allow the paint stick to pivot. The top hole will be used for a pencil. (Check out the video to see more details or the diagrams below.)


The paint stick is used as a compass. Put a pencil through the top hole to draw an arc and put a tack or screw through the bottom hole to use as a pivot point.

The barrel base pieces will have a nice arc after they are cut out with a jigsaw.

Step 5: Attach Barrel to Base
- Pre-drill holes
- Use 3” screws
- Make sure everything is level
Test the base pieces with the barrel. You can make adjustments using a jigsaw or a a flap sander on an angle grinder. Use a level and tape measure to make sure the barrel is level and sits even.

Side view of the barrel.

Staining the base pieces.

Attach the whiskey barrel to the base using 3 inch wood screws. Drill pilot holes first so the wood does not split.
Step 6: Build the Table Apron
- Cut 1×4 boards to fit around the barrel
- Join using a Kreg Jig
- Attach to barrel with screws
This gives the table a clean, finished edge.
The total length of the barrel was 37 inches so I cut two pieces of 1x4 board to 37 inches. The total width of the barrel at its widest point is 27 inches. I flushed up the 1x4 with the barrel and then cut two pieces 20 inches long for the sides.


My helper Nala! She has to learn how to use a drill sometime!

Cut a 1x2 or 1x3 board to use for the decorative base piece. Mine was 29 inches long (2 inches longer than the 2x12 base piece). Bevel the ends at 45 degree angles.


Step 7: Build the Tabletop
- Cut 1×8 boards to length
- Join with pocket holes
- Leave a slight overhang for opening
*This creates the lid for hidden storage inside the barrel
*Set the Kreg Jig to the 3/4 inch stock setting and space the pocket holes about 6-8 inches apart from each other. Then connect the boards using 1 1/4 inch Kreg Jig screws.

Step 8: Add Hinges (Optional Storage Feature)
Install hinges to turn your table into a storage chest.
Use it for:
- Blankets
- Pillows
- Firewood
- Or even a drink cooler
Install hinges to turn your table into a storage chest.
Use it for:
- Blankets
- Pillows
- Firewood
- Or even a drink cooler
The hinges I used were about $6.00 and can be found here.

Step 9: Final Touches
- Stain any unfinished boards
- Apply a polyurethane for added protection. I ended up doing 3 thin coats of Minwax polyurethane on the table top.
Enjoy!


My good buddy Dustin and I made another table for his family. The only big difference is that we painted the metal bands an oil rubbed bronze color.

Oh yeah... I also use this as a WHISKEY BARREL DIY COOLER! Line it with plastic and you'll have ice cold drinks for your next gathering!

Final Thoughts
This DIY whiskey barrel coffee table is one of the best builds if you want something:
- Unique
- Functional
- Affordable
- Beginner-friendly
It’s a guaranteed conversation starter and one of those projects people always ask about.
Looking for Other Barrel Projects?
I'd recommend checking out my:

Cheers!