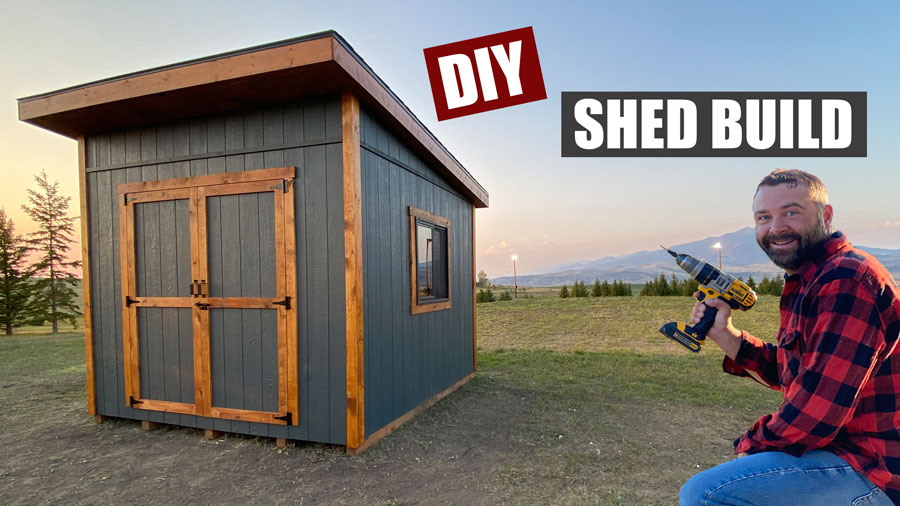
Watch the full step-by-step lean-to shed build in the video below.
In this step-by-step tutorial, we’ll guide you through the entire process of how to build a Lean-To Shed — from start to finish. Building a lean to shed is fun and the project will teach you all sorts of new skills that you can use to build other structures like man caves, she sheds, backyard offices, storage sheds, and other outbuildings. This is a 10x10 shed with a single pitch roof. Let's dive into more details about the shed build below. Are you interested in getting the plans? They can be purchased here.
Shed Building Video
DIY Pete's 10x10 Shed Plans
Would you like to purchase plans to help guide you through the process? Please download here for the detailed plans. The plans come with a materials list and editable spreadsheet to help you calculate up to date costs.

Tools
Some of the shed building essentials can be found on my Amazon Store and Lowes Storefront. If you need more tool recommendations or curious about the tools I trust and use in my builds, check them out!
Plan your shed
Determine how large you want to build your shed. Before getting started, check with your local homeowners association or city to determine if permits or size restrictions apply. In many cases, building the shed on skids classifies it as a temporary structure. If built on skids, I'd recommend placing it on a 4 inch gravel pad once complete so it is level and has proper drainage. You could do a concrete pad, concrete blocks, or sonotubes if you'd prefer.
Purchase materials
To get started, my first step was to come up with a design and then purchase the materials. I chose to build a 10 foot by 10 foot shed with a single pitch slope. This is often referred to as a lean to style shed. This style of shed has a modern look and is pretty straightforward to build. I purchased most of the lumber at my local Home Depot and Kenyon Noble.
How much does it cost to build a 10x10 lean to shed?
There are many variables that will affect the cost to build a shed. At the time I built my shed in September of 2021 the cost for the wood was about $1850. The cost for the supplies (shingles, window, nails, hardware, etc) came to $760. The total cost to build my 10x10 lean to shed was $2610. The total cost does not include labor.
How long does it take to build a 10x10 lean to shed?
Great question. This will vary depending on your skill level, amount of help, and time you are able to work on it. On average, most DIYers can complete the shed in 7 to 12 workdays with consistent effort. If you're working only on weekends, expect the build to span over a month or two. That said, a skilled builder using detailed shed plans may finish faster, while beginners might take a bit longer as they learn along the way.
No matter your pace, this project is a great opportunity to gain hands-on experience — and the skills you learn can easily carry over to future DIY builds!

Building the skid foundation and platform
I chose to build the shed using pressure treated 2x6 boards for the joists. The joists are spaced every 16 inches on center. Underneath the joists are five 4x4 pressure treated boards. These are used as skids. Skids give you the ability to move the shed. I tacked the joists to the skid at each location and used metal brackets for additional strength. I also used some 6 inch long structural leg screws from the bottom of the 4x4 and through the joist.

The platform or shed floor
The shed floor is made of plywood. A 3/4 inch thick tongue and groove plywood is best for a floor. At the time of construction, the pandemic had caused plywood prices to spike. To keep the project affordable, I opted for 23/32” CDX plywood, which was half the price. I used a chalk line to mark the joists and make straight lines for cutting.

The lean to shed floor is 10 feet by 10 feet. The plywood is attached to the joists using nails.

Walls for a lean to shed
Framing walls for a shed goes fairly quickly and is a lot of fun. The rear wall measured about 7 1/2 feet in height.

After being built, the walls are stood up and secured in place using framing nails. Make sure to nail into the outer joist.

Double top plates add additional strength and provide a way to tie each wall together.

Surprisingly, framing for the rough opening of a window or door is easier than you might think. If you look at framing diagrams online you'll be able to figure out how to do it. I used 2x6 boards for the header.

For my shed, the walls were all built to the same height. As you can see, I used 2 jack studs (trimmers) on each side under the header for the doors.

Next, I added a smaller wall to create more height at the front of the shed. I wasn't originally sure what would look nice for the pitch, so I built the smaller wall and then laid a rafter up top to get a look. Next time, I would simply build the front wall with 2x4x10 boards so it wasn't two separate walls that needed to be tied together. This process was pretty easy to do, but using just one wall is probably a better way to do it. My pitch ended up being about a 1.5/12 pitch.

Rafters for a lean to shed
The rafters are made out of 2x6 boards. They overhang the front a couple feet and the back about 10 inches. A birds mouth cut was made at the front and back of each rafter in order for the rafter to rest flat on the top plate. The rafters were secured every 24 inches on center using hurricane clips.

Sub facia was added to the front, back, and sides. This ties the rafters together.

Siding
First, an angled sidewall was added beneath the rafters. Next, blocking was installed between the rafters. This created a solid backing so the siding could be securely fastened to the upper part of the wall. In the photo below, Pete is adding 4x8 sheets of siding to the shed. 2 inch long nails in a coil nailer are used to secure it to the studs.

Roofing
I used 7/16 inch plywood for the roofing material. OSB is another material option you may consider to use.

Paint the shed
I rolled on the first coat of paint. I'd recommend using a roller with longer than 1/2 inch or more nap so the paint goes into the grooves of the siding. I used a dark grey or charcoal color to match my other shed. It took 2 coats total which was about 1 1/2 gallons of paint.

DIY Pete Stain and Paint Colors
I've had a lot of DIY'ers ask about the colors I used. So I've added these photos of the cans to the post. For the paint, I used the Sherwin Williams paint on the left. It is an Iron Gray color, but they don't have it in their system so they did a custom match. If you don't want to go to Sherwin Williams you can simply look for a charcoal colored paint.
For the stain I used Olympic Elite in the Atlas Cedar color. I used semi-transparent. If you want to match my paint color either take a photo of the paint code or print off this picture to have Sherwin Williams match it perfectly.


Facia board
1x8 boards were used for the facia. All sides of the boards were stained prior to installing them.

Shingles and underlayment
Drip edge was first nailed to the back side of the shed. Next, I rolled an underlayment out and nailed to the plywood with capped nails. I used a synthetic underlayment, but tar paper is another (less expensive) option you may consider. Next, drip edge was installed on the sides, as seen in the photo below.

In the next step I used a starter roll of shingles and then nailed down the shingles. It took 5 boxes to do the entire roof.

Shed doors
The doors were framed out of 2x4 boards. I used pocket holes and screws to connect the boards. Next, I attached OSB to the backside of the doors to increase strength and prevent warping. Lastly, I attached the siding to the frontside of each door.

Shed window
We had an old white vinyl window left over from another project that I decided to paint black. To do this, I first took the glass panes out of the window frame. Next, I sanded the white vinyl with 400 grit sandpaper to help the paint bond better to it. Then I used rubbing alcohol to clean the window prior to applying a black exterior grade spray paint. This spray paint is meant to be used on plastic and vinyl. Once dry, I reinstalled the window panes using a clear silicone. Another option you could use for a black finish is a glazing tape.

Trim for a lean to shed
Oftentimes an engineered trim with a wood pattern is used on sheds. There was a shortage of it at the time the shed was built, so I decided to use 1x4 pine boards and to use an oil based exterior stain on them. I used a large brush to stain all sides of each board. I used 1/2 inch thick plywood for the soffit. Additional blocking may need to be added prior to putting up the soffit.

Paint was applied to the doors and the trim was laid out.

Install doors and hardware
I used three six inch hinges to install each shed door. The added hardware included handles, latches, and barrel bolts installed to the doors.

How to organize a shed and build shelves
Before you start filling the shed, take the time to build shelves and install organization accessories to maximize space and keep things tidy. We built custom shelving for this shed that includes detailed plans for a 3 column tote shelf unit made for Costco brand totes. Learn more on how to make these shed shelves in my post How to Make Shed Shelves and watch the video below for an overview on the process.

There are detailed tote shelf plans available that share all the measurements, a shopping list, and cut list. This will save you a lot of time over trying to figure out the perfect dimensions and what you need to purchase. You can purchase the shelf tote plans here.
Below is one more idea and youtube video I made that shows how to build a shelf loft, shelves, and racks for tools.


Start using your new shed
I hope this How to Build a Lean To Shed tutorial was helpful and that the video helps guide you through the basic process. If you have further questions or need additional assistance, please comment below or reach out on instagram.

Other shed projects and warming house
A big reason I built this shed was to practice my skills and to see what I liked and disliked about the design. My next plan is to build a 12x20 foot ice rink warming house for our backyard hockey rink!

The warming house project is complete! Check out the build in the video below. If you would like to learn more about this build, click here to my post.

Additionally, you can learn more about the rink in my hockey rink post with a video showing the overall process on how it was built.
Please share your projects below in the comments!
I'd love to see what you come up with. Please share photos of your shed, man cave, she shed, backyard office, or other building you built below! If you enjoyed this build, follow along on my Youtube Channel. Cheers and have fun with the project.