Thank you for checking out the How to Build a Lean to Shed Tutorial. In this post, we'll walk through the overall process of how to build a lean to shed from start to finish. This shed could be finished to be a man cave, she shed, backyard office, hockey rink warming house, tiny house, or whatever you'd like it to be. In our case, we built the shed to be a hockey rink warming house and finished it with that in mind. However, you could certainly decorate it to fit to your style and it could be plumbed for a bathroom if it was being used as a tiny house.
*Please note there are affiliate links in this article. By using the links to purchase the items used in this project you are helping support our DIY Projects with Pete. Thank you!

How much does it cost to build a 12x20 shed?
This is a great question and there are many variables. My exact shed with the finished interior was about $13,0000 to build as of June 2022. The project was actually built in November of 2021 when prices were cheaper, but I decided to report the costs of the total build for the date when the video was posted. I did find the siding and a couple of the windows on Facebook marketplace which did save me money. To save money you could use T1-11 panel siding to minimize costs, use reclaimed, or used materials if you can find them.
Do you sell plans?
We sell plans for most of our projects but have not yet drawn up plans for this build. We might create plans if we get enough requests. A 12x20 shed can be customized in many ways with windows and door placement - but we could do it for a few standard sized windows and doors you could find locally and then customize as you'd like. Please go to our contact page and send us an email if you'd like to see plans made.
12x20 Shed Materials list
We do not have a material list at this time. If you are looking for a detailed list, google 12x20 sheds and you should be able to find some. I do have an Amazon Store folder for shed builds here but for an over all shed build, not specific for this shed.
If you need more tool recommendations or curious about the tools I trust and use in my builds? Visit my Storefronts on Amazon and Lowes to find everything I recommend for DIY projects big and small!
Hockey rink warming house
We built this lean to shed as a warming house where people can put on skates, warm up, hang out, watch hockey, and have some cold beverages or hot cocoa. The floors are 3/4 inch thick rubber horse stall mats, the walls are plywood, and the ceiling is tongue and groove pine. Later, we installed a large window on the front side of the shed to take in the views and watch the hockey action.

Hockey rink project
Here is a look at the hockey rink we built on our property and where the warming house is currently placed. As you can see, we wanted the warming house to be up higher then the rink, in a flat area, and pointed towards the direction of the rink and mountains. If you are interested in checking out how we built our backyard hockey rink you can watch the backyard hockey rink build on Youtube here.

Determining how to build a foundation for your shed
There are many ways to build a foundation for your shed. Many folks will pour a concrete pad and then build the shed on top of it. Others will pour concrete footings or use sono tubes to create pillars. With this method you can then use beams on top of the pillars and do a joist system. Another method is to build a ski foundation, which is what we'll be doing for our lean to shed.
Skid foundation for a shed
There are a few benefits to building a shed using a skid foundation. One benefit of building a lean to shed with a skid foundation is that it can be moved around your property. For us, we wanted to put the shed near our hockey rink. However, we may not always use this shed for the hockey rink and so we wanted to have the option to move it to a different location on our land. With skids, we could also load it on a flatbed and we could move it to another property or location.

What is a skid foundation?
A skid foundation is basically a shed built on a platform with large 4x4, 4x6, 6x6, or other sized boards used to form the foundation. The skid building then can be placed on level ground, like a concrete or gravel pad. A gravel pad is going to be one of the cheapest options and will allow the shed to be picked up and moved easily when needed. Our particular skid foundation uses 2x6 joists to form a deck-like platform. These joists rest on four large 4x6 skids and are connected to the skids using a combination of brackets and fasteners.

A 10x10 shed build on skids
Here is another example of a shed built on skids that we built. As you can see, 5 4x4 skids were used to help create the foundation for our 10x10 shed. I have a post about the 10x10 shed here.
Skid foundation platform
Once the skid foundation and joists were completed, 3/4 inch tongue and groove osb was attached to the joists to form the floor. This essentially completes the platform prior to framing the walls.

Framing the walls
The walls were framed using 2x4 boards. Eight foot long boards were purchased for the majority of the project and ten foot long boards were used for the front of the shed. I used 2x4x12 foot long boards for the bottom and top plates. There is a double top plate. LVL beams were used for the headers over the front and rear window. They were 1 3/4 inch thick engineered boards and I fastened two together to match the 3 1/2 inch thickness of the walls.

Sheathing the walls
7/16 OSB was used for the exterior walls of the shed. It's basically 1/2 OSB so if it is labeled 1/2 inch that will work great as well.

Rafters and sub facia
The rafters are 2x8x16 foot boards cut down in size to about 15 1/2 feet. The front overlap is about 2.5 feet and the back overlap is about 1 foot.

The sub facia is also built using 2x8 boards. Prior to sheeting the roof, the rafters were blocked with scrap 2x8's as well. ( not seen in this photo )

Roof sheeting for shed
We used 5/8 inch thick OSB sheeting for the roof. The entire roof was then covered with an ice and water guard that adheres to the roof. The pitch of the roof is 12x2.

House wrap and windows
The shed was wrapped with house wrap and then the windows were installed. The large window on the front is 12 feet wide by about 7 1/2 feet tall.

Lean to Shed siding
Siding for this particular shed is pine channel siding. Our home has cedar channel siding which i'd prefer due to cedars stability and performance in the outdoors, but it was going to be between around about $4000 just for the wood, so I decided to look into other ideas. I ended up finding someone on Facebook marketplace who had just enough of this pine leftover from him siding his home. He was selling it for $400 so I bought it right away.The siding was then stained with Cabot stain in semi-transparent. It is a "White Wash" stain so basically white paint that has been thinned. To reduce the cost of siding and eliminate the need for OSB walls, you could opt to use T1-11 panel siding / LP smartsiding for this portion of the project. I would recommend using a 7/16 inch panel and not a 3/8 inch panel.

Whitewash stain for siding
I've had a number of requests to show the stain being used. The stain I used is an oil based stain in semi-transparent by Cabot. You can usually purchase it at Ace Hardware or Lowes, but it will vary depending where you live. I had my local Kenyon Noble mix it up, but I believe Ace Hardware and others can mix up something similar. It is essentially white stain. You can certainly dilute it more after having it mixed by using paint thinner if it seems too potent, but the mixture I use works great and provides a good coverage after 2 coats that still shows the grain of the wood.
Below, you will see the exact mixture I used on the shed siding which is rough pine channel siding. I used it on our rough finished cedar siding of our home as well, and they both have a similar look. You can see it being applied at this point in the video (about 32:53). Here is a link to the portion of the warming house video.

Shingles for lean to shed
The shingles used are Onyx Black and were bought at Home Depot. These were very affordable and I was able to install them in a few long afternoons. I'd highly recommend investing in a roofing nailer if plan to build a few structures in the future.

Finishing the inside of a shed
Wiring and electrical were ran in the ceiling and walls. 12/2 romex was used for all the wiring. I'd recommend buying about 250 feet. The shed is heated using an old wood stove I took out from the basement of our home. Here is a similar size stove on Amazon, but if you can find something used or even a little smaller you'll be able to save some money.

Shed ceiling, shed speakers, and shed lighting
We used 1x6 pine tongue and groove for the ceiling and sealed it with a waterbased polycrylic satin sealer made by Minwax. The speakers used are 8 inch Polk surround speakers and they have great sound. The LED lighting used for the interior and soffit is easy to install and affordable. We used 6 lights indoors and 4 outdoors. Here is a link for a 12 pack of the lights. A 6 3/4 inch hole saw was used to cut holes for the lighting.
Shed insulation
The insulation used in the walls is R15 made for 2x4 walls and it comes in rolls. For the ceiling we used R21 batts that are made for 2x6 walls. It filled about 3/4 of the cavity but there was still a little room left over for air movement.

Shed internet
We wanted a high speed internet connection in the shed so we could stream hockey games and Youtube TV. Secondly, we wanted to have wireless internet out there so it could be used as an office and to stream music to the rink and shed. To do this, I ended up getting a point to point system which was under $100 for both 2.4ghz units. It hooks up to our internet in the home and then beams a signal to the shed. We then have the receiving unit on the shed hooked up to a normal wireless router and that sends a signal throughout the shed.
You can also set the transmitting unit on the house to send an additional signal to the yard which is really cool. So I can actually go to the back corner of the property with a laptop and pick up the wireless signal from the house which is pretty cool. But you'll still want a receiving unit in the shed to get a better signal and it really helps out if the building is metal since wireless signals don't transmit through metal walls well.

Accent wall
1x6 cedar channel siding was used for the accent wall and interior trim. This siding was also found on Facebook market place. All the cedar was $350 which was a great deal.

Plywood walls for shed
1/2 inch plywood was used for the interior walls. I wanted something durable and that would hold up well if it is ever moved. The plywood was reasonable in cost and easy to install. I used a flexible and paintable caulk at the seams to blend them in. It was then painted with Agreeable Grey paint from Sherwin Williams.

Rubber flooring
Rubber horse stall mats were installed for the flooring. It is 3/4 inch thick and comes in 4 foot by 6 foot sheets for about $50 / piece. We then cut it to size. It will expand and contract with temperature, so leave about a half inch or so around the perimeter of the room for expansion. We chose to go with rubber flooring because it protects the floor from hockey skates and helps insulate a bit. But you could certainly do any type of floor you'd like. I think luxury vinyl would be a great floor for a man cave, she shed, or backyard office.

Wood stove
As i'd mentioned, the wood stove was being stored in the garage a few years since I planned to use it for the warming house someday. To hook it up, I ordered a Duravent chimney kit from NorthernTool which had the best pricing I could find. I went with the Duravent brand and used a triple wall setup as it was cheaper then the double wall version. You'll also need single wall chimney pipe to go from the stove to the ceiling which is inexpensive and available locally. You will need class A chimney pipe above the roof which is a separate purchase as well and a bit spendy, but necessary. Cement board was used to protect the floor from sparks. Scrap metal roofing was then installed against the wall as a heat shield.

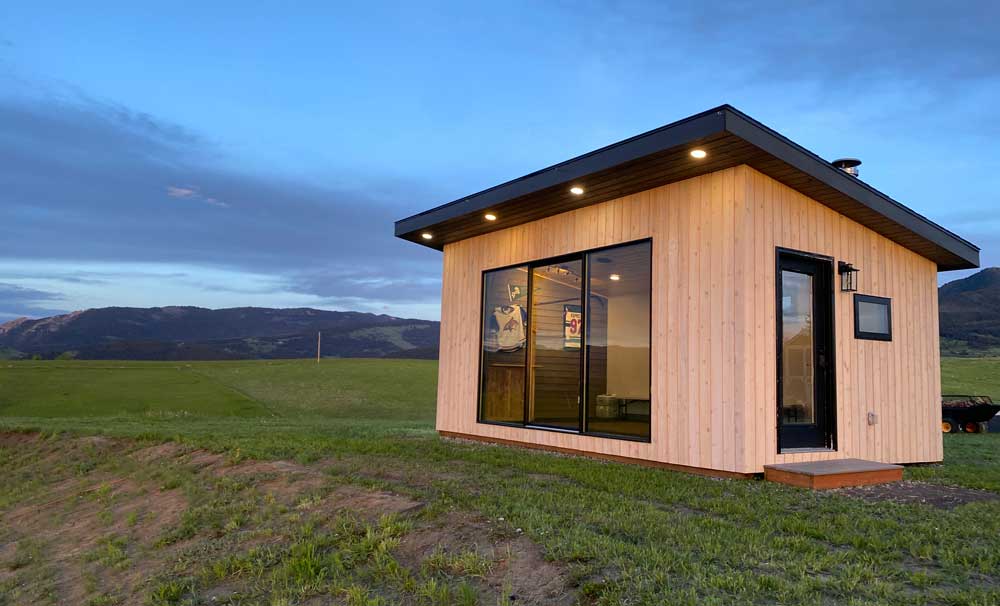
Finished!
Here is the finished interior of the shed. We absolutely love it and it gets a lot of use all year round. In the winter it is a warming house for the hockey rink. So far this spring it was used as an exercise area and man cave. In the summer we plan to use it as an overflow area for guests to stay and as my office. We have a newborn baby so it is nice to have a quiet place to work that is separated from the home. We will be installing blinds to help keep it cool in the summertime.

Enjoy your new lean to shed!
I hope this project inspires you to build your own shed, man cave, she shed, backyard office, or tiny house. This was a fun and super rewarding project for me. While it does take time and money to build, it was well worth the investment for our family.

Please share your shed projects below!
We'd love to see how your projects went! Please share below 🙂 Thanks!
More Projects from DIY PETE
If you enjoyed this project, be sure to check out some of these popular projects below, detailed plans page, and subscribe to our Youtube Channel to not miss any of our upcoming builds. Cheers!