If you are looking for a fun and easy project to tackle I’d highly recommend building a pallet wine rack. We got an inkling for a project this weekend and thought about how cool a wine rack made out of an old pallet would be. So…. we drove behind a couple stores looking for pallets that were going to be thrown out. Within a half hour we found a great looking pallet and were on our way to starting the project.
Project Materials and Costs
Wood – Pallet — FREE
Two Inch Screws and nails — A few bucks
Tools Required
Saw – A hand saw will work but a Miter Saw will make the project go quick! Jig Saw – Used for notching out the wine glass holders and for rounding the side and middle 2×4’s. Hammer and Pry Bar – Used to disassemble old Pallet – A reciprocating saw or angle grinder with a metal cutoff blade is helpful for removing and cutting out old nails. Drill
Cut List 2×4 – QTY 2 Length: 11 inches (Used on both sides)
2×4 – QTY 1 Length: 10 1/4 inches (Used in middle – sits on top of 1×4 that wine bottle sits on.
1×4 – QTY 5 Length: 30″ 3 for back, 1 for front, 1 for wine glass holder
1×4 – QTY 1 Length 27″ (horizontal base piece that holds wine bottles)
1×4 – QTY 2 Length 3″ ( Used as spacer on each side underneath wine bottle support and above wine glass rack )
Our Pallet! Below is a photo of a pallet we found behind a local hardware store in our home town of Bozeman, Montana. It is a good idea to ask the manager in the store prior to taking any pallets in case they are still using them. Many times they’ll have a pile of pallets they want to discard. Retail stores get shipments in on pallets frequently and are usually happy to give away their extra pallets.
We used a hammer, pry bar, and reciprocating saw to remove the boards from the pallets. The pallets consisted of 1×4 pine and 2×4 pine. The 2×4’s on our pallet had neat stamping on them that we used for the outside 2×4’s on our project. In the photo below we are experimenting with spacing to decide how big to create the wine rack.
We rounded the front of the 2×4’s using a jigsaw. Simply take something round (like a coffee can); and trace the can on a corner of the 2×4 to get a rounded corner. Cut the rounded corners. Attach each 11 inch 2×4 to the sides of the 1×4 27 inch long base using nails or screws. Make sure to pre-drill. Next, attach the front and back 1×4’s by nailing or drilling them into the 2×4’s.
Add your two spacers to the bottom of your piece like seen below The spacers are 3 inches wide and provide space to slide in the bottom of the wine glasses.
We measured to be able to fit 6 wine glasses in the rack. At each mark we took a 3/8 inch drill bit to create a rounded slot back. We then used a jigsaw to cut straight lines back to the hole which created a slot.
Here is a photo showing slots the wine glasses will hang from. We spaced them evenly to be able to fit six good sized glasses.
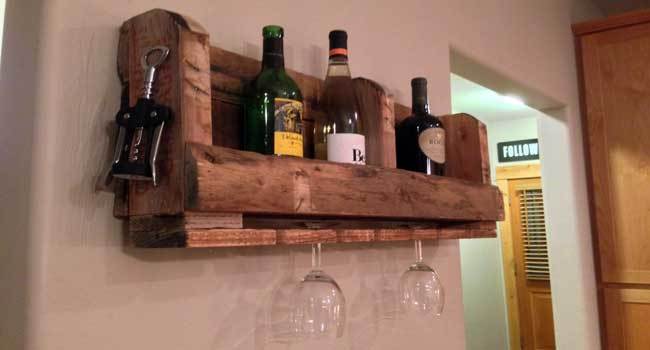
We decided to put a nail in the side 2×4 to make a hanger for the wine opener.
We used a stud finder to determine where the studs were and simply used screws to attach the rack to the wall on the studs which were 16 inches on center.
Turned out looking great! It took us about 2 hour to build and all the wood pallet wood was free. We were very happy with the new rack!
Please share and re-pin if you liked this project. You can make one just like this in an afternoon. Good luck and have fun!