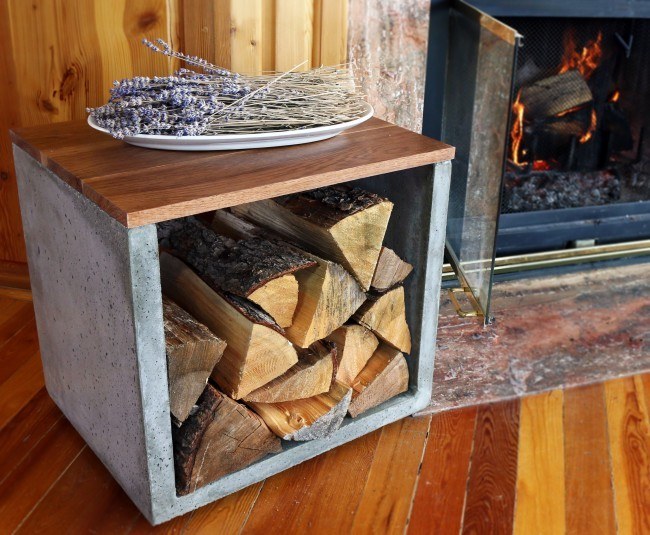
Learn how to make a Concrete Log Holder for holding firewood neatly next to the fireplace. This concrete and wood design is very clean, minimal, and modern. The whole project does not take very long and can be done on a small budget. I had a blast making it and know that you will too! Be sure to check out the video tutorial and the free, downloadable plans.

Tools Needed
Miter SawCircular SawDrillClampsKreg JigSpeed SquareOrbital Sander.Tape Measure, Ruler, PencilEye and Ear protection
Optional:Table Saw
Supplies Needed
Melamine for the Form2.5 Bags of Quikrete Mix – Quikrete 50005 Minute Epoxy by Gorilla GlueConstruction Grade AdhesiveConcrete SealerSandpaper1 ¼” Kreg Screws1 ½” Wood Screws
Steps to Build
Cut the Wood
We’ll start this project by marking and making cuts on the melamine sheet for the concrete form. The melamine form has two parts, an outer box and an inner box that we’ll refer to throughout these plans. Refer to the cut list in the free, downloadable plans for all of the parts, I’d recommend marking and cutting with a circular saw or table saw.

Assemble the Outer Box
We’ll assemble the melamine boxes with screws, being sure to pre-drill pilot holes for the screws to go into. Line up the outer box pieces and start pre-drilling and screwing it together. Make sure that everything is level and flush with the form.

Assemble the Inner Box
The inner box will be screwed together with pocket holes done on a Kreg Jig. Refer to the video for further direction on screwing together and assembling the inner box. Set your Kreg Jig and Bit to the ¾” setting and the box will go together with 1 ¼” Kreg Screws. Again, make sure that everything is level and flush.
Connect the Boxes Together
Once you have built both the inner and outer boxes out of melamine, we’ll need to screw them together to make the melamine form ready for concrete! Now would be a good time to spray everything down with 100% alcohol and give it a good clean, before pouring the cement in. Mark and measure 1 ½” in from either side of the outer box and place the inner box inside there, screwing it into place (be sure to bring the inner box flush to the top of outer box to leave the gap underneath for cement to flow into). Our gap for the concrete to go into should be 1 ½” all the way around and on the bottom. Refer to the free plans for more info.

Mix the Cement and Pour into Form
Once your form is completely built and screwed together, we’ll mix up the cement that will be poured into the melamine form. I did use Quikrete’s Countertop Mix for this project, yet it could be done with very similar results and major cost savings using Quikrete’s 5000 Mix. Countertop Mix costs about $25 per bag and 5000 Mix about $5 per bag at time of this build. This project takes 2 ½ bags. Mix your cement together until you reach a peanut butter consistency, adding more water or cement mix if/when needed, and then start filling the melamine form.
 Pack the Cement into the Form & Reinforce

We want to be sure that the cement mixture fills any and all voids in the form, so pack it into the form with a piece of scrap wood or something similar. Once it’s been packed in and vibrated then we can add bars of rebar. Scrape, level, and trowel the top and make sure the form is completely filled with the cement mixture.

Let Concrete Cure, Then Remove the Form
Let the cement mixture harden and cure into concrete for the recommend time given by the manufacturer of the product. Once it has completely cured, we can remove the melamine form. Unscrew everything and carefully pull the parts off. Now we’ll move onto some light woodworking for the removable bench top / shelf.

Cut and Assemble the Wood Top
Now we’re ready to make the wood bench top / shelf for the top of the concrete log holder. Refer to the cut list in the free, downloadable plans for the dimensions and cuts for this shelf. Cut your pieces to size and then prepare for assembly. Flip the wood top upside down, grab your clamps, line everything flush together, and clamp it in place. Then glue and screw the underside braces into place, pre-drilling all holes, and being careful not to pre-drill through the top shelf. Seal the boards, especially the endgrain of the boards with polyurethane.

Sand and Finish the Concrete
Now we’ll want to sand the whole concrete shape down, easing the edges, smoothing all surfaces, and preparing it for the finishing sealer. Grab your orbital sander, some 220 grit sandpaper and get to work! 🙂 Take your time to ensure you sand all of the surfaces, work your way down to finer grit sandpaper. If needed, you can fill any gaps and voids with a Portland mixture like I go over in the video. Then finish your concrete with a sealant, coating it two to three times.

Attach Bottom Feet and Enjoy!
Then we’ll use Gorilla Glue’s 5 minute epoxy and some construction adhesive to attach the bottom wood feet. Add the epoxy and adhesive, place the feet into place about an 1” in on either side and then clamp together. Once dried, do the same for the other two feet. Let everything dry and you’re done! Enjoy your work.

