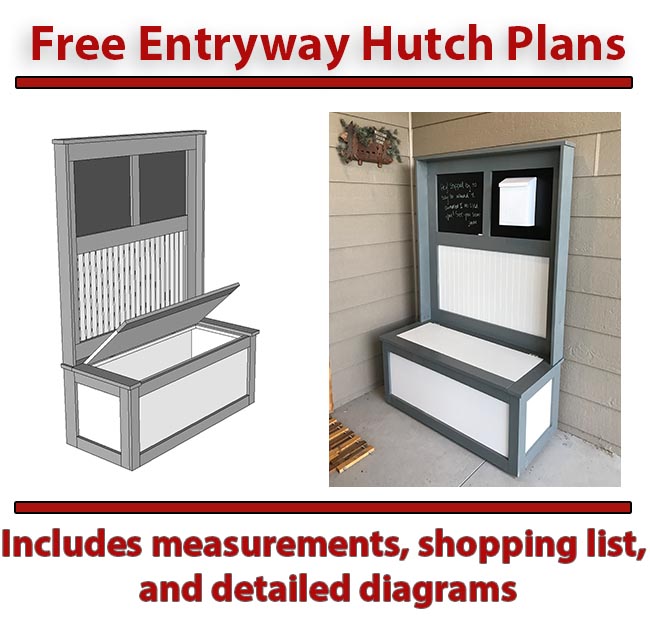
In this tutorial you will learn how to build your own DIY entryway hutch with bench for storage. This is a fun project that can easily be created in a weekend. I partnered with Krylon® Brand for this project. The hutch is a great way to add curb appeal to your front porch and can be used for a variety of purposes. I use mine as a message board, mail area, and for newly delivered packages. The DIY entryway hutch plans can be downloaded here.

Download the Free Plans

Gather Materials
Gather your materials to build this project. You will need plywood, 1x4 / 1x6 boards, beadboard, a chalkboard, hinges, wood screws, glue, and Krylon® COVERMAXX Spray Paint in Gloss Machinery Gray and Gloss Ivory (available at Sherwin-Williams stores).
Make your cuts
Use the plans to measure and mark for your cuts. A straight edge will help ensure you’ll get the boards as straight as possible.

Start by creating the panels that will form the chest. I cut the boards using a circular saw with a real steady hand. Take your time and follow the line as best as possible.

A table saw is helpful if you have one. You’ll need to cut quite a few boards down in width for this project.

Assemble the chest
We’ll attach each of the panels together using pocket holes and wood screws. Set the pocket hole jig to the ¾ inch stock setting.

Wood glue should be used at all joints to ensure you have a long lasting piece of furniture.

Three of the four sides have been attached. Notice pocket holes are only made on the end boards. 1 ¼ inch long pocket hole screws attach the panels.

Fit the bottom side panel between the side panels. Attach around the perimeter.

Add feet
Cut a 1x4 board into 3 ½ “ x 3 ½” squares to create the feet. This will keep the plywood off the ground and help prevent water damage.

Temporarily attach trim
Cut the trim to size using a miter saw. Temporarily attach it to the box to make sure everything is cut to the correct size. This step is not absolutely necessary, but I do recommend doing so because it will ensure the boards all fit properly when it comes to the final install. Only attach with a couple nails since we’ll remove it to make the painting process go quickly.

Create support for lid
Cut the boards and create pocket holes to attach them. These boards will help strengthen the chest and provide support for the chest lid.

Here is a photo showing the lid support around the back, left, and right sides.

Assemble lid surround
The lid surround will go around three sides on the top of the chest. We’ll attach this after painting.

Build the upper section
The upper section is built out of 1x6 and 1x4 boards. Assemble the outer frame first.

Add 1x4 boards around the perimeter to strengthen the frame. Set them in about ¼ to ½ inch from the backside of the unit. This will give us a lip and the spacing needed to attach the chalk board and bead board.

In this photo you can see the spacing on the backside.

Sand the furniture prior to painting. I’d recommend 120 or 220 grit sandpaper.

Here is a photo of the finished upper section of the hutch. Feel free to modify the panel areas to best suit your needs.

Cut the chalkboard and beadboard to size.

Dry fit the beadboard and chalkboard to double check that they fit correctly.

Time to paint!
It’s time to give your new hutch some life! I love to customize my projects with fresh coats of paint. For this project I used Krylon COVER MAXX Spray Paint. Krylon COVERMAXX Spray Paint in Gloss Machinery Gray and Gloss Ivory complimented each other well and gave the hutch the look I was going for. Remove the temporary trim and de-nail it to prepare for painting.

Always wear a respirator or make sure you are in a well-ventilated area while using spray paint. Also be sure to read safety and application instructions on the can before you begin painting. Krylon COVERMAXX is a paint and primer so there was no need to use a separate primer. I used three coats of Krylon COVERMAXX in Gloss Machinery Gray to achieve the look I desired.

A drop cloth will help protect the area you are working in. I prefer to spray outdoors when it isn’t too windy. Krylon COVERMAXX will have a long lasting and durable finish. The spray tip is easy to push and the painting process will go rather quickly.

Let the paint on the trim cure for a couple hours prior to assembling.

Paint all sections
Take your time and paint each section of the hutch. I used Krylon COVERMAXX in Gloss Ivory on the beadboard and the larger sections of the chest.


Attach painted trim
Attach the painted trim to the chest once you’ve given it plenty of time to dry. The paint is dry to handle in 1 hour, and I waited a couple of hours to assemble.

Attach the trim that forms around the lid. Use wood glue and screws.

Make the lid
Connect the trim board to the front of the plywood lid.

Add hinges
Connect the hinges with ¾ inch long screws. Use one hinge on each end.


A lid support can be attached to one side. This will keep the lid open while putting items in the chest.

Secure the chalkboard and beadboard
Connect the chalkboard and beadboard from the backside using ¾ inch screws.

Enjoy!
I hope you enjoyed reading this tutorial and that it inspires you to build an entryway hutch. This hutch can be made and used for many different spaces in your home. Feel free to customize the design to best fit your needs. Have fun with the build!
