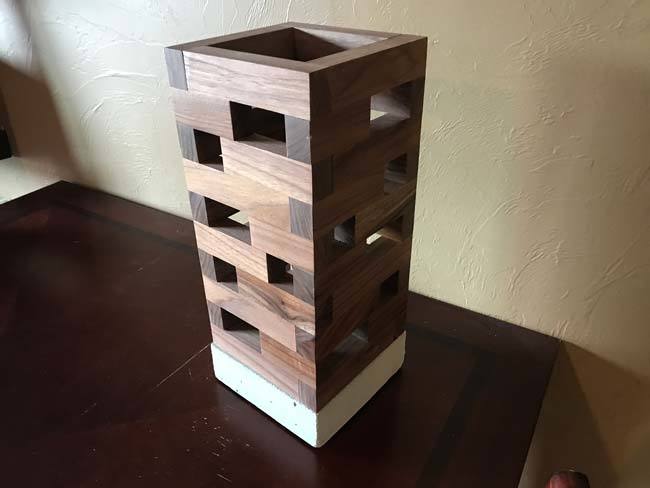
Are you looking to add some fresh ambience to your home? This Walnut Accent Lamp will bring warm light and modern style to any space you put it in! I had a lot of fun building this with Brad from Fix This Build That and I know you will have fun making it too. It’s a project that is very rewarding to finish and I am really happy with how the walnut and concrete compliment each other. Let me know what you think in the comments and post pictures if you end up making one!
You can check out Brad’s Youtube Channel here http://www.youtube.com/fixthisbuildthat for more DIY Projects!
Free Plans for the Walnut Accent Lamp

Supplies and Tools
Tools Needed
*Please note – Some of the tools have been updated to current tools I use and some links in this article are affiliate links. By using the links to purchase the items used in this project you are helping support DIY Projects with Pete. Thank you!
- Miter Saw– I’d recommend a 12 inch sliding, miter saw.
- Drill
- Table Saw
- Jointer
- Planer
- Circular Saw – Could be used in place of miter saw
- Chisel
- Bolt Cutter
- Speed Square
- Tape Measure, Ruler, Pencil
- Ear and Eye Protection, Mask
- Clamps – Clamps are helpful for any project
- Concrete tub, mixing stick
Shopping List
- Walnut Scraps
- Scrap Melamine
- Concrete
- Concrete Spray Sealer
- Lamp Kit
- Edison bulb
Approximate Total Cost to Build (at time of post) : $55
Get Building
Start out the build by using a planer and jointer to get all boards to be perfectly square. There will be a lot of seams between boards in this project so the more square the boards are, the better the end product will look.

Rip the boards on the table saw to the correct width.

Cut pieces to size
Once the boards have been ripped to size, set up a stop block to cut each of the three lengths of board that will make up the lamp shade.

Glue sides together
Glue the sides together in the correct pattern. Then, attach each of the four walls together to complete the lampshade portion of the build.

Make Melamine form and pour concrete
Assemble the form for the concrete base out of Melamine boards and pour in the concrete with a knockout in the center for the lightbulb hardware.

Assemble and Finish
Once the concrete is set, add in the hardware for the lightbulb and put the lampshade over the base.

Plug in and enjoy the new lamp!