
If you are looking to build a desk, this elegant and rustic looking desk is your next project! This desk or side table is easy to build and makes a great weekend project. The desk consists entirely of 2x4, 2x6, and 1x4 boards. The only special tool you'll need is a KregJig. I got mine off Amazon and it is one of my favorite tools in the shop! Since getting one, a couple of my good friends and family members have added them to their tool box.
Main Tools Used
Need more tool recommendations or curious about the tools I trust and use in my builds? Visit my Storefronts on Amazon and Lowes to find everything I recommend for DIY projects big and small!

Step 1 - Print plans and Gather Your Materials
I used Ana White's plans for this project. She teamed up with Whitney from Shanty2Chic.com to create this beautiful piece of work.
Watch My Desk Video Tutorial
Check out my modification
The only modifications I made to Ana's plans were to make the top out of 2x6's and to add breadboards to each end.
So, for the top you'll need to cut:
- QTY 4 2x6 x 61"
- QTY 2 2x6 x 22.5" (breadboard ends - will cut down about 1/4 to 1/2 inch once you are ready to connect it to the four boards that are kreg jigged together.


Step 2 - Make Your Cuts
Use a miter saw to make all your cuts. If you don't have one, I'd recommend getting a 12" Dewalt Miter Saw for your DIY projects.

Step 3 - Assemble I-Beam Desk Supports
Use 2x4's and the 1x4 to make the I-Beams. Assemble using screws or a nail gun. Use glue when attaching the 4 cross supports (shown in tutorial video).

Step 4 - Connect the two I-Beams
Use your Kreg Jig to drill pocket holes in the aprons and supports that span the width of the deck. If you desk will be against a wall, I'd recommend having the pocket holes on the outside.

Step 5 - Add Cross Supports

Step 6 - Attach Top
Attach the top to the base using the pocket holes. (Shown in tutorial video)

Step 7 - Finish (Stain)
For this table I used the dark walnut stain from Minwax. Wipe 1 coat on with a clean rag and let it dry.

Step 7 - Add Polyurethane
Brush on 2 coats of polyurethane. Once the second coat is completely dry, use a block sander with 300 grit paper to lightly sand the table. Once sanded, blow off the dust and then wipe with a clean, damp rag. When dry, use a clean cloth to wipe a thin third coat of poly on the entire piece. Let dry and then you are finished!

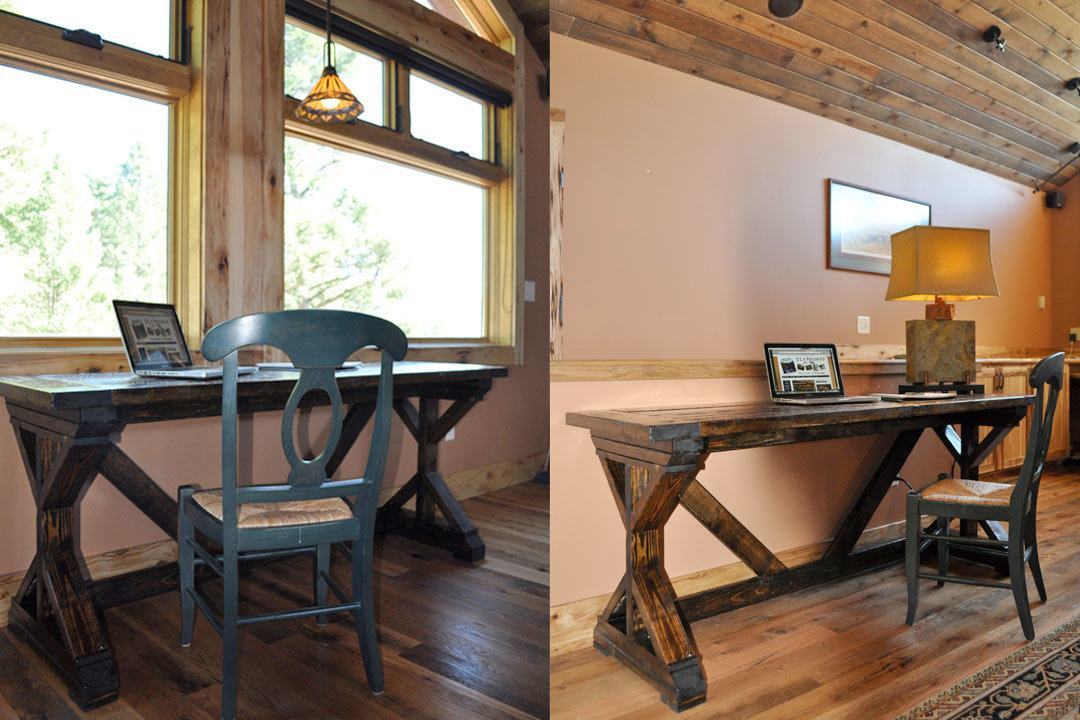
Finished Desk
Thanks so much for checking out my tutorial! I hope it inspires you to build this desk and that you enjoy it for years to come. If you run into questions make sure to check out the video at the top of the post or comment below with any questions. Subscribe to DIY PETE Youtube Channel to follow all our upcoming builds and check out our plans page for detailed instruction on your next build!
If you are interested in more desk and furniture builds, you might enjoy some of my other projects:
- How to Build a Farmhouse Table
- How to Build a Patio Chair
- How to Build a Lean To Shed
Good luck and have fun!! - DIY PETE