If you’re dealing with hard water, on well water, or just want the safest drinking water possible for your family, this post walks through how to install a water filtration system for your home. Watch our video on the process to get the complete breakdown.
This is the follow-up article to my previous post on testing our water and choosing the right system. In this guide, I’ll focus specifically on how the water filtration system was installed, what tools and materials were used, and what to expect if you decide to tackle this project yourself.
The good news is that this is a very DIY-friendly project and can save you thousands of dollars compared to hiring a pro. If you think this setup would work well for your home, use Promo Code DIYPETE10 for 10% off your entire order at Springwell.
Please note there are affiliate links in this article. By using the links to purchase the items used in this project you are helping support our DIY Projects with Pete. Thank you!
Automatically shuts off water if something goes wrong
Can be controlled and monitored from your phone
To install the smart water monitor with automatic shutoff, I used a SharkBite fittings to transition from the copper to the valve, inserted the smart water monitor and shutoff valve, then converted the rest of the system to ¾" PEX. Make sure to install the shut off valve before the filter.
PEX Tip: If you’re new to PEX, watch a few tutorials first. I’m not a plumber, but this is absolutely something you can learn and do correctly with a little prep.
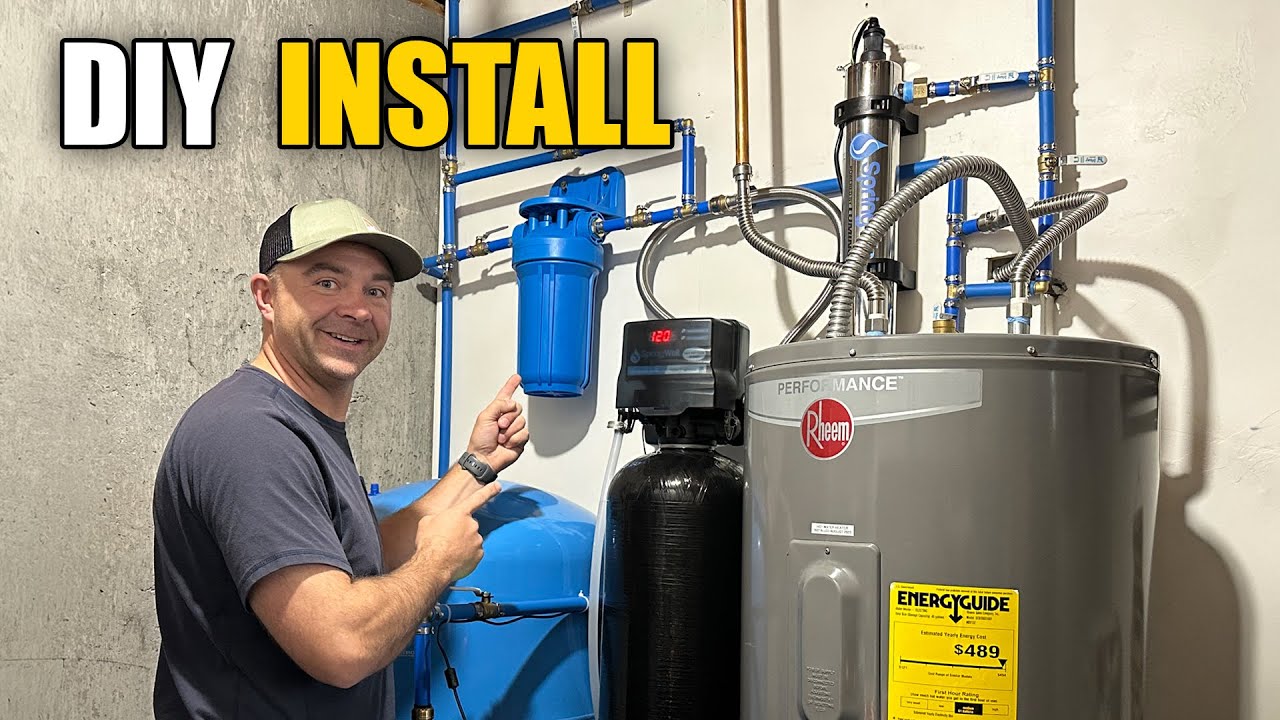
Step 3: Sediment Filter Installation
The sediment filter is the first line of defense for your system.
We installed a 500-micron filter that can be replaced when needed. I mounted the bracket to a ¾" plywood wall and then attached the water filter. I used fittings with Teflon tape wrapped clockwise around and then attached them to each side of the filter. The water will flow from left → right.
This filter keeps larger particles from entering appliances, water heater and softener.
Pro Tip: Apply Teflon tape to all threaded fittings and connections for a water-tight seal.
Step 4: Water Softener Installation
This was my first time installing a water softener, but it was very manageable.
Key steps:
Install bypass valves, then add elbow fittings for flexible lines. I moved the unit into position and connected the inlet/outlet lines.
Black tubing is then ran from the softener to the brine tank and connected to a push fitting inside the tank. Clear drain tubes were ran from the brine tank to the floor drain with a step bit used to enlarge drain holes (mine were too small). I used zip ties to secure the tubing in place.
Lastly, I added four 40-lb bags of salt pellets to get started.
Step 5: First Regeneration Cycle
The softener connects via Bluetooth and is configured through an app.
Run an initial regeneration cycle. My initial regeneration took ~90 minutes
The system flushes capture minerals and ensures the system is running smoothly. It will go through about four stages than begin to fill the brine tank. When the cycle is finished the unit will display the amount of gallons remaining until the next cycle is needed.
I set mine to regenerate at every 14 days, or at 3,926 gallons, whichever comes first. Stay nearby during the first cycle to check for any leaks.
Step 6: Clean Fixtures After Softener Install
Once soft water was running:
We cleaned all fixtures with vinegar and removed old hard water buildup. Shower heads, faucets, and glass doors have stayed clean ever since with cleaning noticeably easier with the softer water.
Step 7: UV Filter Installation
Since we’re on a well, we decided to add a UV filter to give us peace of mind between annual well shocks.
First, mount the brackets to wall. Make sure to leave extra clearance above the unit for bulb changes. I used a pex connection for where the water lines will connect to the filter. Then the display unit was mounted to the wall.
Next the UV unit was inserted securely into the brackets. The glass sleeve was inserted carefully, follwed by the threaded peice and a spring. Then, make sure to wear gloves and insert the UV bulb. Attach a power cord and twist it in place to complete the basics of installing your UV filter.
I'd recommend adding a bypass valves for easy servicing of the UV filter. Lastly, insert the key into the display and turn it on. The display will track the bulb life and alerts you when it’s time for replacement.
Step 8: Reverse Osmosis (RO) System Install
This reverse osmosis system lives under the kitchen sink and provides ultra-clean drinking water. Clean out your under sink cabinets and turn off your water supply. You'll need a hole for the RO faucet. We used an existing soap dispenser hole or you might have to drill a hole.
Steps to Install:
First, disconnect your current kitchen faucet from the water supply. You'll use a 'T' to split the line so it can go to your current water or your new osmosis system.
The tank will fit underneath on a stand and you'll have to find a good spot to mount the filters. Mark and drill a hole in your drain pipe. This is going to be where your RO system with drain the waste or excess water. Clamp on your connection peice and tighten. I used a drill bit to stick in the hole to make sure it all lined up.
Next, prep the storage tank by using the teflon tape and supplies provided and find a spot to place it. The filter cartridge holder can be mounted to the cabinet. Keep it raised high enough so the filter cartages can be replaced when needed. The filters have different shaped attachments for easy installation. Label your filters with replacement dates to make it easy to remember when it's time to change them out. This is usually every 6 to 12mo depending on the filter type. Twist each filter in place, making sure each is locked into position.
Then, you will put a little white tube into the blue one, which will attach to the second filter from the front. Cut the other end of that 1/4in black tubing and connect it to your water supply. This is what gets water to the RO system. Snap the elbows in place and then connect the white tube to the cartridge holder from the water tank.
Next, I removed the soap dispenser to free up a hole to put in the RO faucet. Place the black ring onto the faucet and then fish the two blue tubes through the hole. Connect them to the faucet by pushing them in place before resting the faucet into the hole. It works best to get under the sink and fastened the faucet from the bottom side to tighten it up against the counter and then the gray fitting connected the gray tube to the faucet.
Lastly, a 3/8 inch blue tube waistline was connected into the hole in the sink drain and then the other end of the gray line connects to the front of the cartridge holder.
After installation fill up your tank and drain it completely twice with run cycles. Then the water is ready to drink. Yes, it takes up cabinet space—but the water quality is worth it in my opinion.
If you would like a more of a breakdown on these steps, check out Moens detailed video.
Bonus: Connecting RO Water to the Fridge
To get RO water at the fridge I installed a T-fitting on the RO line and then ran a 1/4" tubing to the fridge. To do this, I purchased a fridge hookup kit that ran about $20. We also added a shutoff valve for service.
The pressure in the fridge is slightly lower, then the faucet but now we have excellent ice and water straight from the fridge as well.
Final System Flow (Utility Room)
Water pathway:
Well → pressure tank
Smart water monitor & shutoff
Sediment filter
Water softener
Water heater
UV filter
Flows to the rest of the house
I added bypass valves for the sediment and UV filters as well as valves for an exterior hose bib for easy service and to have an option to send softened water outside to fill our hot tub.
Maintenance & Costs
Ongoing Maintenance
Add salt every few months
Replace sediment & RO filters as scheduled
Replace UV bulb annually
Cost Breakdown (Approx.)
Softener + sediment + RO: ~$2,200 (with 10% promo) for a 4-6 bedroom home at time of this post
UV filter + smart monitor: ~$3,700
Pipe, fittings & tools: added cost
Hiring this out would have cost several thousand dollars more.
Was It Worth It?
Absolutely!
We have noticed much cleaner dishes, no water spots on appliances, and dishes and overall better running appliances with this water filtration system. Plus, it is a peace of mind to know we have excellent drinking water for our family.
If you’re comfortable with research, learning as you go and planning carefully, this is a very rewarding DIY project.
Got Questions?
If you’re deciding if this water filtration system is the right fit for you or have any tips on your set up, drop a comment below—I’d love to hear about your setup or help however I can.
Thanks for following along! If you want further breakdown on the steps for this specific water filtration set up, check out this article by SpringWell.
If you enjoy this content and would like to follow along with more DIY projects, check out DIY Projects with Pete for more tutorials.