A few years ago I made some tile coasters with maps of countries I had visited. So many friends have asked about where I got the coasters, and wondered how to make them. So, I thought I’d do a video tutorial to show the process! It is a very quick and simple project. Plus, it is super affordable. A 9 pack of tiles is $4.00, and the other supplies you buy will last for dozens of additional coasters.

Tools and Supplies:
Pack of Tiles (any type)
Mod Podge
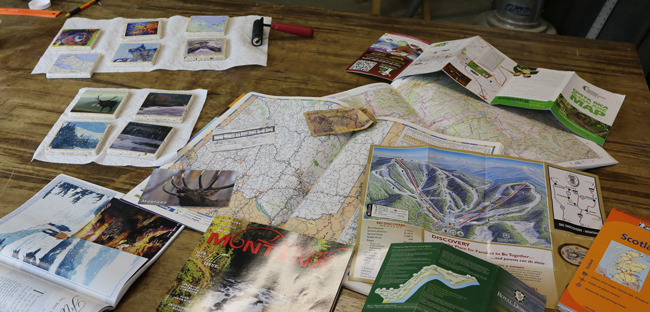
Photos, magazine clippings, old Maps, post Cards, travel tickets, etc as designs on the tile
Scissors or Craft Trimmer (Optional)
Foam Brush
Ruler
3/8 inch felt pads (4 circles for each coaster)
Spray Sealer (to waterproof and protect coasters)
Roller (optional)
Total Project Cost: Approximately $20 for everything. With the sealers / mod podge you’ll be able to make at least 50 coasters. Simply buy more tiles to make dozens of holiday or birthday gifts!
Design Ideas:
Photos, Magazine Clippings, Old Maps, Post Cards, travel tickets, ski trail maps etc.
 Project Steps:

Clean Tiles
Clean the tiles using a rag and water or rubbing alcohol. This will remove any dust or debris from the tile.
Cut Designs

Cut designs for the coasters. Use photos, magazine clippings, old maps, newspaper, memorable travel tickets, or anything else that would be fun to have on a custom coaster. I’ve used maps of towns I’ve lived in and places I’ve visited on vacations. In the video tutorial I use some cool photos of paintings, wildlife, and a few maps from a recent trip to Costa Rica. I’d recommend cutting the designs slightly smaller than the actual tile. The tiles I used are 4 inches by 4 inches. I cut the photos down to 3 1/2 inches by 3 1/2 inches. The artist of the colorful wildlife used in this project is by Teshia Art of Missoula, Montana.

Apply Mod Podge to Tile

Apply a thin layer of Mod Podge to the top of the tile with a foam brush. This will act as an adhesive to stick on your design.
Apply Photo / Design

Put the design on the tile. Push air bubbles from the center out to the sides and make sure the design is centered on the tile.

Apply Mod Podge to top and sides

Use a foam brush to apply three thin coats of Mod Podge to the top and sides of the coasters. Brush in alternating directions for each coat. Let the Mod Podge dry to the touch (about 10 – 20 minutes) between coats. The Mod Podge will dry clear.
Apply Spray Sealer

Apply 2 coats of a clear spray sealer to the coasters to seal and waterproof them. Make sure to do this in a well ventilated area. Spray the top, sides, and bottom side. Let the sealer dry for 20 minutes or so. Allow the smell to dissipate before taking inside.
Add Felt Pads

Apply felt pads or cork to the bottom side.
Enjoy or Gift your new DIY Coasters!


Wrap them in some twine and gift them to a friend or family member for a birthday or holiday gift! If you are thinking about selling your coasters at a Farmers Market or online, I’d recommend selling for between $18 and $30.

