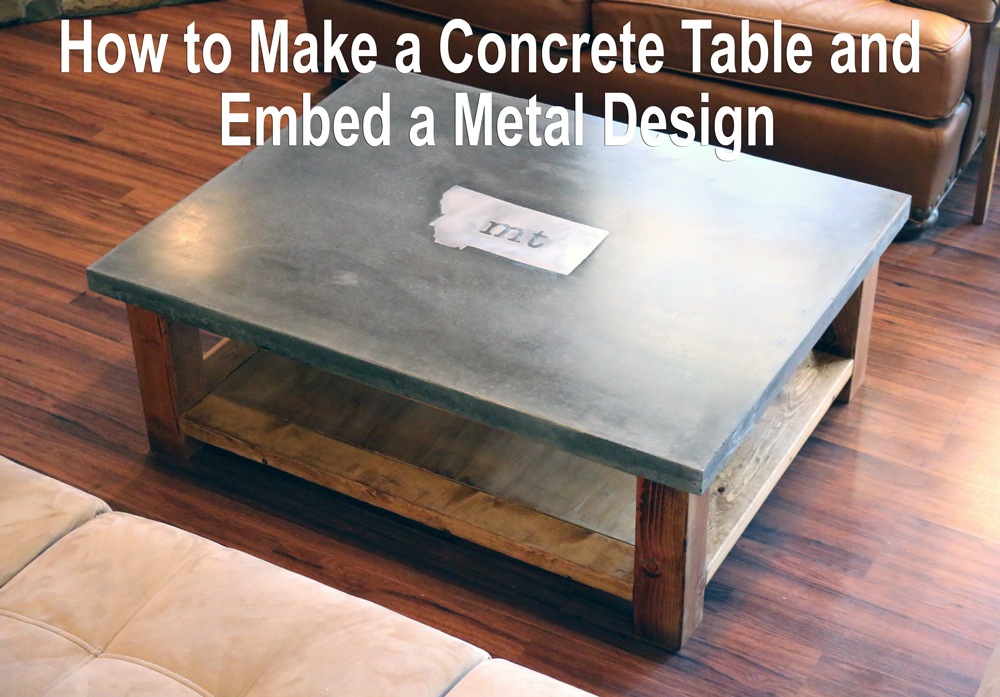
Thanks for stopping by to check out how make a concrete coffee table and how to embed metal designs or logos in concrete. This project was a lot of fun and we love how it looks in the living room. The table top is a 2 inch thick slab of concrete. The metal design I used is an outline of Montana, which is where I live. Feel free to embed any custom metal logo or design of your choice! Please refer to the FREE plans and the video tutorial for more details in addition to this post. The total materials/supplies cost for this project (not including tools) was around $165 at time of the build.
Download Free Concrete Coffee Table Plans Here
 Video Tutorial
Gather Supplies, Materials, and Tools
Shopping List:
- QTY 5: 80 pound bags of concrete ($5.70/bag)
- Qty 1: Quart portland cement ($4.00)
- Qty 1: Box 1 ⅝” long screws for building mold ($5.00)
- Qty 1: Tube of 100% silicone caulk ($4.50)
- Qty 1: Piece of 10-14 gauge Steel or stainless steel for design (Approx $14)
- Qty 1: 4×8 sheet of remesh ($8.00)
- Qty 2: 8 foot pieces of ⅜” rebar $(3/each)
- Qty 1: Box 2 ½” long pocket hole screws ($6.00)
- Qty 1: Box 1 ¼” long pocket hole screws ($6.00)
- Qty 2-3: Bottles of concrete coloring ( 1 for every 2 bags ) OPTIONAL $6/bottle
- Qty 1: Acrylic concrete sealer ($13.00)
- Qty 1: Wood stain / Poly ($15.00)
- Qty 1: Concrete mixing tub
- Scotch pad
- Sharpie marker
- Razor blade, paper towels, rubbing alcohol
- Wood glue
- Drill bits
- Custom Metal Stencils
Please note: Some of the links in this post are affiliate links. If you purchase an item through the link my website will get a small commission at no extra cost to you. Thank you for helping support the DIY Pete website!
Wood:
- Qty 1: 4’ x 8’ x ¾ inch thick sheet of melamine ($37)
- Qty 1: 4’ x 4’ sheet of 3/4 inch thick plywood for shelf ( or laminated pine ) ($14)
- Qty 1: 4”x 4” x 8 feet long board ($8.50)
- Qty 4: 2” X 4” by 8 feet long ($2.50/board)
Please read: These are dimensional lumber measurements and how the boards are marked at your local lumber yard. (a 2×4 board is actually 1 1/2 inches thick by 3 1/2 inches wide).
Tools:
- Pocket Hole Jig
- Miter Saw– I’d recommend a 12 inch sliding, miter saw
- Table Saw
- Circular Saw
- Drill
- And/OR Impact Driver
- Orbital Sander – Ryobi makes a nice one.
- Concrete Trowel
- Concrete Polisher
- Polishing Pads
- Plasma Cutter (or have a local company cut a design)
- Rubber mallet, flat screwdriver or chisel
- Squeegee (optional)
- Shovel or mason hoe to mix concrete
- Buckets / cups for mixing concrete
- Angle Grinder with 120 Grit Flap Disc
- Tape Measure, Straight Edge, Pencil
- Sanding Block with 600-800 grit sandpaper
- Paint Brush
- Pencil
- Speed Square
- Clamps (optional)
- Dust Mask
- Respirator
- Eye Protection
- Ear Protection
- Rubber Gloves
Approximate Cost (at time of build): $165
Prices will vary depending on where you live and where the wood is purchased. Here is a look at the approximate costs. They are pretty conservative and you may already have a lot of the screws/sealers etc around the shop. The total cost does not include tools.
Conservative Concrete Mold Supplies and Concrete Supplies: $104Wood: $33.00 Stain/Sealer/screws etc: $28.00
Make the Concrete Table Mold
Use a table saw or circular saw to cut the 4×8 sheet of melamine down to size. Measure and use a straight edge to draw out the lines to follow. I used a table saw since it is a lot easier to manage if you don’t have someone else helping out with the project.


 Add reinforcement

Cut a 4×8 sheet of re-mesh to fit in the mold. It should have an inch of wiggle room between the sidewalls around all four sides.


Create a metal design or logo

I do a lot of metal work and other projects and so I decided to buy my own vinyl plotter so I could make cool decals and stencils for projects. The Grapthtec CE-6000 is a very good quality plotter that is reliable and professional grade. I’d recommend it to anyone. If you’d rather have stencils made for you I’d recommend getting custom decals and stencils for your DIY projects from my good friend James at www.signsofthemountains.com/.


I cut out the design using my Hobart 250CI plasma cutter. It is one of my favorite tools in the shop. I’ve had mine for about 7 years and it’s worked great. The newest model is the Hobart 12i Plasma cutter and you can get it on Amazon.


Mix and Pour Concrete!

Mix the concrete in a large mixing tub. I used between 4 to 5 bags of Quikrete 5000 in 80 pound bags. Feel free to add concrete coloring if you’d like. I added Quikrete in charcoal to give my finished table a little darker look. Mix the concrete to about an oatmeal consistency.


De-mold the concrete

Remove the screws and slowly pry away the sidewalls. A chisel or flat screwdriver helps for this process. Always pry against the wood and not against the concrete.

Polish the Concrete

I wet polished the concrete using a concrete wet polisher. If you don’t have a concrete wet polisher I would recommend checking out my concrete dining table project because I show how to finish the concrete with an orbital sander. I recommend polishing around the perimeter of the underside of the countertops. This way when people run their fingers along the underside it will feel finished and professionally done. I used 200 grit first, and then finished with 400 grit. You can do the rest of the underside if you’d like, but it is up to you.


Seal Concrete Counter

Use a water and acrylic based sealer to seal the concrete. For actual countertops where food is prepared, I like to use Cheng’s concrete sealer. However, for a basic coffee table you can simply use a standard acrylic stone and tile / concrete sealer available at the hardware store or Home Depot. Use 2 coats on the underside to seal it up.


Build the table base

Build the table base out of 2×4 / 4×4 boards and plywood. I used a Kreg Jig to make the pocket holes. Drill pocket holes on the ends of all 2×4 boards. The measurements can be found in the FREE Concrete Table Plans here.
Finished Project Photos

Here is a side view of the 2 inch thick concrete table top.


TAKE ACTION AND BUILD!

Download the FREE Plans Today!
Enjoy!
I hope this project tutorial post, video, and the Free plans inspire you to build a concrete table. Thank you so much for taking the time to read this post to the end. Best of luck with your upcoming DIY projects!
Please Like, Comment, and Share with your friends and family if you found this tutorial helpful. Cheers from Montana!
