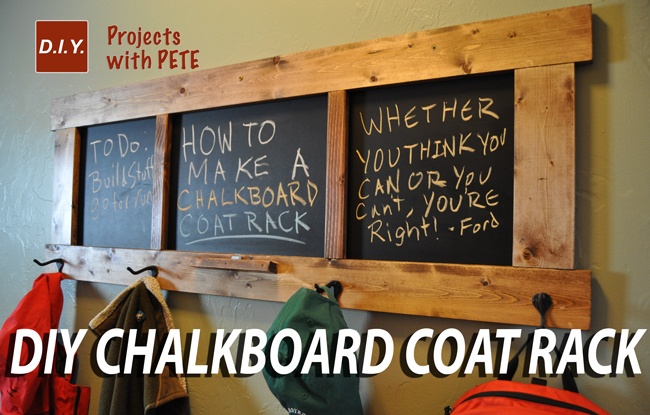
A number of DIY’ers have been asking if I’d create a video tutorial on how to make a chalkboard coat rack and so I gave it a go! The barnwood chalkboard tutorial I made in the past was helpful, but you can’t find barnwood at a typical lumber yard. So, this project shows how to make a chalkboard coat rack with basic wood that you can find at any lumberyard or store like Home Depot.
Click here to download the Free Chalkboard Coat Rack Plans!

Shopping List
Please not that many of the links in this post are affiliate links. This means you are helping support more free projects and tutorials on DIYPETE.com whenever you go through a link to purchase tools or supplies. For instance, anything you purchase through my Amazon Store will allow DIY PETE to focus more time creating free tutorials and project videos for you. Thanks for your support!
QTY 2 – 1x4x8 Pine for top outside frame boards
QTY 1 – 2 foot by 4 project size chalkboard
QTY 1 – 1x2x8 board for the two vertical pieces
QTY 4 – Coat rack hooks – I used oil rubbed bronze hooks from home depot (they came with tiny screws to mount them)
QTY 6 – 3 inch screws to hang chalkboard coatrack on the wall
Wood Glue (I used Gorilla brand)
Polyurethane
Stain – I used Special Walnut from Minwax
Chalk and Eraser
Box of 1 1/4 inch Kreg Screws
Tools Needed

Saw ( Miter Saw, Circular Saw, Jigsaw or Handsaw )
Drill – Used for attaching chalkboard to wall and for attaching hooks
Kreg Jig or pocket hole tool – To attach 2×4 to the plywood (could also use screws)
AirStrike Nailer, Air Nailer, or Hammer
3/4 inch nails to attach Chalkboard
1 1/4 inch nails to attach chalk holder (optional)
Tape Measure
Straight Edge
Carpenters Square
Safety glasses
Hearing protection
Stud Finder
Cut List
QTY: 1 – Chalkboard 48″ wide by 17″ tall
QTY: 2 – Cut 1×4 boards to 51″ long
QTY: 2 – Cut 1×4 boards to 12″ long
QTY: 2 – Cut 1×2 boards to 12″ long
QTY: 1 – Chalk Holder – Cut a 1×4 down to 1 inches wide by 8 inches long and add a 15 degree angle (optional)

Step 1
Cut the 2 foot by 4 foot chalkboard down to size. The cut piece should be 48 inches wide by 17 inches tall.

I used my Ridgid 4512 table saw for this process. You can use any table saw, circular saw, jig saw, or hand saw for this process.

Step 2
Cut the 1×4 boards and 1×2 boards down to size. Measurements are shown below and the cut list is toward the top of this post. Please note that a 1×4 board you buy from the store is actually 3/4 of an inch thick by 3 1/2 inches wide. The 1×2 board you buy from the store is actually 3/4 of an inch thick and 1 1/2 inches wide.

Use a miter saw or circular saw to cut the 1×4 and 1×2 boards to size.

Step 3
Layout the pieces to make sure everything is going to fit. Notice that I cut a scrap 1×4 board down to 1 inch wide by 8 inches long to use as a chalk holder. I cut a 15 degree angle on the table saw so the chalk rack slants to hold the chalk.

If you don’t have a table saw or aren’t able to cut angles be creative and think of something else that might hold chalk. A drawer cup pull would be a simple solution that you can screw on.
Step 4
Use a Kreg Jig to make pocket holes on the 12 inch long 1×4 and 1×2 boards. Set the Kreg Jig to the thickness of the wood which is 3/4 of an inch.

This is what the Kreg Jig holes will look like. Use wood glue and 1 1/4 inch Kreg Jig screws to assemble.

Step 5
Stain or paint the wood. I used a clean rag to wipe on two thin coats of Special Walnut stain from Minwax.

Step 6
Seal the wood with polyurethane. I’ve found that Fast-Drying Polyurethane from Minwax works great for this project. It protects the wood, gives the wood a warm look, and dries super quick. Spray on a couple thin coats.

Step 7
Center the chalkboard on the backside of the frame. Attach using 3/4 inch nails and either an air nailer, Airstrike tool from Ryobi, or a hammer and nails.

This is what the backside will look like once it is complete.

Step 8
Attach the chalkboard. The studs in your wall are generally 16 inches apart from each other (16 inches on center). You can pre-drill holes in the chalkboard and then drive 3 inch screws through the chalkboard and into the studs in your wall. Use a stud finder to find each stud prior to putting the screw in the wall.

Make sure the chalkboard is level and then drive in the screws. I like to do the center screw first and then do one to the left and one to the right.

Woohoo! It’s all hung and ready to go. Use this for grocery lists, fun drawings, quotes, and whatever you can think of. This is an easy project that you can definitely tackle. Please share your chalkboard coat rack project photos below or share to the Facebook page. Good luck and have fun!
