A couple weeks ago I was browsing Craigslist and saw a trailer with potential. The old rusty blue trailer for sale was about 10 miles from my home town of Bozeman, Montana. It needed an overhaul before it would be ready to use, but I knew it would be a great trailer once I spent a solid Saturday working on it.
In this post I’ll share the basic steps involved when restoring an old trailer. You’ll find that trailers can be restored quickly and affordably.
Step 1
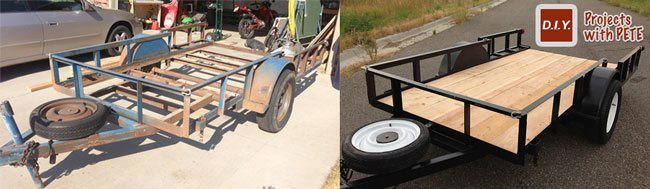
Find an old trailer that needs some work. Check for broken welds, bent axels, loose bearings, and any other defects. Many of the trailers I’ve found simply have old boards, rust, and a sometimes a broken weld or two. Don’t forget to check if the lights work as well.

Trailer I picked up for $350
Step 2
- Remove old boards if you’d like to replace them. This will take some elbow grease because the bolts and screws are typically old and rusty. Grab a socket set and a drill for this step. It’s also handy to have an angle grinder with a metal cutoff disk to cut bolts or metal during removal.
- Grab an orbital sander and start sanding all the surfaces you can see with 150 grit sand paper. Wear a respirator because it will kick up dust. Remove as much rust as possible and sand over the painted areas so the new paint will bond well. For real rough areas I’ll sometimes use an angle grinder with a flap disk. Flap disks remove metal and rust very quick and are perfect for smoothing out welds or sharp corners.
- If needed, fix broken welds using a welder. I have a nice 120 Volt welder that will plug into any normal outlet. I got it from Amazon and it works well. It is called a flux-core welder and so it doesn’t require purchasing gas like you need to with a Mig Welder.
Below is a photo of the trailer after it was sanded. Notice the rust around the wheel-well and tongue has been removed.

Sanded Trailer
Step 3
Use an air compressor or broom to remove all the dust from the trailer prior to painting. Next wipe all surfaces with a damp rag. Finally, it is time to paint! Wear a respirator while painting so you don’t breathe any of the chemicals. Tape or mask off areas that you want to avoid painting. Once prepped, paint all metal surfaces using an enamel spray paint. I used Black Gloss Spray Paint from Rustoleum. Apply one or two coats until you get a nice even finish.
To paint the wheels, it is best to take off the lug nuts and then tape off what you don’t want to get paint on. However, I was in a hurry and simply taped off the wheels and sprayed the entire hubcap with Rustoleum white spray paint. You can paint the spare in the same manner. Painting the hubs really sealed the deal and made this trailer look brand new.

Painted trailer
Step 4
Now is a good time to fix any wiring problems on the trailer. Mine had very old wiring and was broken in quite a few places. Hence, none of the lights worked. Instead of splicing and spending time to fix all of the wires / connections; I simply purchased a wiring kit for about $15.00. I also went ahead and got the flat 4 to 7 pole converter to hook the lights up to my Chevy truck.
I had to replace one of the trailer light units on the back of the trailer because it was ripped off. If the light case is in good condition simply check the bulbs to make sure they work. Bulbs can be picked up for a dollar or two.
Basic trailer wiring goes quickly and is pretty simple. The trailer I worked on Simply had 2 rear lights. They had running lights, brake lights, and blinkers. Use the harness and wire it according to the diagram.
Either use zip ties or trailer wire clips to ensure the wire is snug to the frame. Use a wire crimp tool and crimp connectors to attach the trailer wiring to each light. A little electrical tape comes in handy to cover the connections when finished.

Step 5
Cut the replacement boards to size. My trailer had six 2×10 pine boards and one 2×4 in the center. Next, fit the boards back into the trailer and attach accordingly. Use new screws or bolts. It’s a good idea to put a spar varnish on the boards to help prevent them from weathering. Use tire polish to make the tires look like new.

Step 6
Hook the trailer up to your vehicle and test all lights to make sure they work. Then start hauling your toys! Or, you’ll be able to turn around and sell the trailer if you want to make a quick buck. My trailer was purchased for about $350 and I put about $100 into it. The restored trailer is now valued around $850-$1000 if it is titled and street legal.
Good luck and please comment below if you have any questions!