Concrete furniture looks amazing and really is cheap to do. Tables can be made without expensive or specialty tools and will jazz up your home or office in no time! I’ve built many tables and desks using these exact same processes.
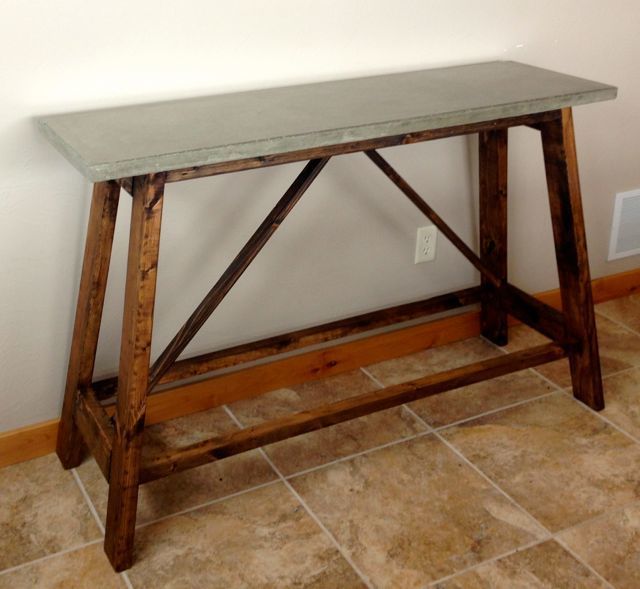
This tutorial will explain and show you how to build a DIY Concrete Table top for any sized table you’d like to build. The actual base will not be explained, but full instructions to build it can be found on a Ana-White’s amazing DIY website. I modified her plans by adding to the overall dimensions and removing the wood top.
Project Level: Intermediate
Tools Needed for DIY Concrete Table:
Orbital Sander – Dewalt makes a great orbital sander for around $50.
Drill – I use a Dewalt Drill
Circular Saw
Table Saw – Optional (can use a circular saw instead)
Small Shovel (To mix Concrete)
Bolt Cutters (To cut wire re-enforcement)
Concrete Trowel – $10
Flathead screwdriver or chisel
Sanding Block with 100 Grit sandpaper (or a diamond pad).
Supplies:
- 1 to 2 bags of concrete (depending on size of table) – I use a mix available at stores like Home Depot or Lowes ($5/bag) SAKRETE or QUIKRETE 5000 work great.
- Portland cement – You may have to buy a full bag for $10.00. It will last for a long time as you only need a pint or so per table.
- Wire Mesh – Pictured to right of concrete (Available in 4×8 Sheets) – $8.00 – You can also use Diamond Mesh
- Melamine wood – (Will cut to the size you want your table. You’ll cut strips to use on the sides of the mold as well. Available in 4×8 Sheets or smaller project size pieces. I like to use the 2 foot by 4 foot pieces for coffee tables.
- Rubber gloves
- Painters tape
- 100% Silicon Caulk
- A couple plastic cups to mix cement paste
- Tub to Mix Concrete in – (You can also use a big 5 gallon bucket)
- 1 5/8″ Drywall Screws to attach sides of mold
- 120 and 220 grit sandpaper for orbital sander

Concrete Mix for your DIY Concrete Table Top

Wire Re-enforcement

Tub to mix Concrete

Melamine for Making Concrete Table Molds
How to Make a DIY Concrete Table
1. Determine the size of table top you’d like to make.
The buffet table I made is 17″wide by 52″ long by 1.5″ thick. Here is a diagram showing how I made the mold.

2. Cut the bottom of the mold out of melamine using a circular saw
This piece should be the exact width and length you’d like the concrete table to be.
3. Cut the strips that will border the bottom piece
If you want a 1.5″ thick concrete slab, add 3/4″ to the strips so they are 2.25″ tall. This accommodates for the bottom of the mold.

Mold Pieces Cut
4. Assemble the sides of the mold.
Attach using 1 5/8 inch black drywall screws about every 8-12 inches. Drill a pilot hole to help it go in easier. Make sure to drill in from the side as evenly as possible.

5. Complete the mold
Once assembled, the mold will look like the photo below. You will now have a structure which concrete can be poured in. Note — the actual top of your concrete table will be very smooth because it will cure against the smooth and flat melamine surfaces. The part that you screed and trowel later on will actually be the bottom side. You will flip the mold once the project has cured.

6. Caulk the creases in your mold.
In the video I use a squeeze tube of 100% silicon caulk. You can also use a caulk gun. Then run a caulk tool to smooth it out. You can also use painters tape to get an even caulk line as pictured below.

7. Once caulked, use your finger to smooth out the bead.
Have paper towels around to clean off your hands when finished! As soon as you are finished pull the tape off while the caulk is still wet. Use a paper towel to remove any caulk that accidentally gets on other parts of the mold. Let cure for a few hours.

8. Cut Re-enforcement
Once the caulk has cured, go ahead and cut the re-enforcement to size using a bolt cutter. If your table is 52″ long by 17″ in width, cut the metal wiring to about 50″ by 15″. It will leave about an inch of play on each side. Then use rubbing alcohol and a paper towel to thoroughly clean the mold, making sure all sawdust and particles are out of the mold.

9. Mix Concrete
It’s time to mix up the concrete. Follow the directs on the bag to see how much water they recommend adding. I like to pour some water into the tub prior to the concrete to minimize dust. Wear a dust mask for this process because the particles are not good to breathe. Mix 1 or 2 bags of concrete at a time. To stir up the concrete use a small shovel or garden hoe. I like to mix it to a peanut butter consistency. If it is too dry add a little more water at a time. If too much is added, put in a little more concrete mix.
*Now is the time to add liquid or powder coloring to the mix if you’d like. Another way to add color is by using concrete acid stain after the project has cured.


10. Pack Concrete
Take a handful of concrete (wearing your rubber gloves of course), and start packing the concrete into the mold. *Don’t forget to make sure your work table is as level as possible prior to packing the concrete.

11. Add Re-enforcement
Once the mold is filled up a little more than half way you’ll want to add the re-enforcement. Simply put the re-enforcement in place and then finish packing the rest of the mold with concrete.

12. Fill and screed
Fill the mold with concrete until it is full. Take an old 2×4 or straight piece of wood and screed off the excess to level out the concrete. Move the 2×4 in a sawing motion. Continue back and forth across the entire mold (multiple times) and fill in any low spots with extra concrete. Check that your work table is still level. You can always shim if needed. A level work table will make sure your concrete table is an even thickness throughout.

13. Vibrate the Concrete / smooth with trowel
Once you’ve finished leveling out the concrete lift your work table slightly up and down to vibrate the concrete. Vibrating the concrete will help minimize the number of air bubbles in your finished piece. This is a very important step. Another way to help vibrate the piece is to hit the bottom side of the table (underneath your piece) with a rubber mallet or hammer. Then use the hammer (or an orbital sander ) to vibrate the air bubbles out from the sides (tap the sides with the hammer). Finally, use a basic concrete trowel to smooth the concrete. The part you trowel will actually be the bottom of the concrete tabletop. You want the bottom side to be flat so it rests on your table base.

14. Sit back and relax – Wait 3 to 4 days – Have a cold one!
Now it’s time to sit back and relax. Let the concrete piece cure for a good 3 to 4 days before removing it from the mold. Cheers!

Taking a break out on the deck near Bozeman, Montana
Part 2
15. Remove concrete from the mold
Remove all the drywall screws. Next, take a chisel and slowly pry the wood side away from the concrete. Make sure not to let the chisel (or flathead screwdriver ) touch the concrete.


Use a sanding block to soften the edges. Make sure to work from the corners and not into them. In the photo below, you’d start the sanding block at the corner and move to the left. This prevents blowing out the corner. Run the block lightly around all bottom edges. (It will only take a couple minutes.)

16. Flip the concrete and remove top of mold
Slowly flip the concrete. It helps to have two people. I like to take a few shop rags or foam to put under the concrete so when it is flipped vertically there is something for it to rest softly on. Continue flipping the piece and rest it on a few spare boards. Resting it on boards that are evenly spaced will allow the piece to dry thoroughly.

Flip vertically onto rags or foam.
Remove top of the mold.

Fresh out of the mold. Admire it!

17. Sand concrete
Use an orbital sander to smooth the piece. You will expose a few more bug holes but that is okay. Run the sander on the sides and corners as well. The top edges will be pretty rough. You’ll fill in the rough area with portland cement after this process.

18. Fill bug holes and smooth edges with cement paste
Mix portland cement (not normal concrete mix) with water until it is a toothpaste consistency. You could mix the cement with a concrete fortifier to help it bond as well, but is not necessary. Rub the paste into the bugholes using a circular motion. Fill any other areas with the paste as needed. To fill the rough edges in put some paste in the bridge between your thumb and index finger. Slide along the edge as shown below. After filling the holes use a plastic putty spatula to remove excess paste. Let sit for 1 to 2 hours and then do a final sanding.

19. Final Sanding
Use 120 and the 220 grit sandpaper to remove extra paste and to give the table top a smooth finish. Round over the edges as well.

20. Apply Sealer
Use a clean rag and get any remaining dust off the concrete. Next, find a new rag and use it to apply a stone or concrete sealer. These can be found at a local hardware store. Read the instructions to find out the best way to apply the sealer. Once the sealer drys I like to wax the piece. It adds an extra layer of protection and shines the piece up a bit. The paste wax I use is Johnson’s Paste Wax and can be found in the wood stain section at the hardware store.

Apply the wax in a circular motion. Then buff it with a clean microfiber rag or terry cloth. It will be smooth and shiny!

21. Set the concrete piece onto your base. If needed, feel free to run a thick bead of 100% silicon caulk around the top of base so the concrete piece doesn’t shift. I’d recommend using caulk on a coffee table because your feet pushing against it will shift the concrete. On a buffet table you could go with or without.

Nice rounded edges

Smooth finish
Building a base
The base I built for this particular concrete top was designed by Ana-White. She has an amazing blog with all sorts of furniture projects. I modified the plans to fit this table. To see the design I was inspired by click here. Ana has detailed plans for the truss table project. My version is even featured on her site at http://ana-white.com/


In a future post I will talk about other finishing methods. Below is a photo of what a table looks like if you grind it using a wet polisher and expose the aggregate (rocks/sand). It can be a neat effect as well, but requires a special polisher found here.

Please comment below if you have questions or have other tips to share. Good luck!
If you found this post helpful I’d love to have you friend my page on facebook. Just click on the like button!
– THANKS SO MUCH!